Cách Vệ Sinh Máy Hút Thuốc: Hướng Dẫn Bảo Trì Toàn Diện
David Martinez
Concentrate Expert
Cách Vệ Sinh Máy Hút Thuốc: Hướng Dẫn Bảo Trì Toàn Diện
Vệ sinh máy hút thuốc của bạn thường xuyên là điều cần thiết để duy trì hiệu suất tối ưu và đảm bảo trải nghiệm hút thuốc mượt mà. Dù bạn là người mới hay là một người đam mê lâu năm, việc hiểu cách vệ sinh đúng cách thiết bị của bạn có thể kéo dài đáng kể tuổi thọ của nó và nâng cao hương vị của cần sa. Hướng dẫn toàn diện này sẽ hướng dẫn bạn qua các bước vệ sinh các loại máy hút thuốc khác nhau, cùng với một số mẹo hữu ích để làm cho quá trình này dễ dàng hơn.
Máy hút thuốc có nhiều hình thức và phục vụ các mục đích khác nhau, từ máy hút thuốc thảo mộc khô đến các mẫu tinh chất. Mỗi loại yêu cầu các kỹ thuật bảo trì hơi khác nhau, nhưng tất cả đều có mục tiêu chung là mang lại những hơi thuốc sạch sẽ và đầy hương vị. Hãy cùng đi sâu vào chi tiết để giữ cho máy hút thuốc của bạn luôn trong tình trạng tốt nhất.
Câu Trả Lời Nhanh
Để vệ sinh máy hút thuốc nhanh chóng và hiệu quả, hãy tháo rời thiết bị của bạn, ngâm các bộ phận có thể tháo rời trong rượu isopropyl, nhẹ nhàng chà sạch cặn bã, rửa bằng nước và để nó khô hoàn toàn. Vệ sinh thường xuyên đảm bảo hiệu suất và hương vị tốt hơn từ máy hút thuốc của bạn.
Mục Lục
- 5. Lắp Ráp Lại Máy Hút Thuốc Của Bạn
Tại Sao Vệ Sinh Máy Hút Thuốc Là Quan Trọng
Vệ sinh máy hút thuốc của bạn thường xuyên là rất quan trọng vì nhiều lý do. Đầu tiên, nó đảm bảo rằng bạn nhận được hương vị tốt nhất từ cần sa của mình. Cặn bã từ các phiên trước có thể tích tụ và làm thay đổi hương vị của hơi thuốc của bạn. Thứ hai, việc vệ sinh ngăn ngừa tắc nghẽn và đảm bảo rằng thiết bị của bạn hoạt động trơn tru. Theo thời gian, cặn bã có thể chặn luồng không khí, dẫn đến việc hút thuốc không hiệu quả.
Hơn nữa, một máy hút thuốc sạch sẽ thì vệ sinh hơn, giảm nguy cơ hít phải vi khuẩn hoặc nấm có thể gây hại. Bảo trì thường xuyên không chỉ kéo dài tuổi thọ của thiết bị mà còn nâng cao trải nghiệm hút thuốc tổng thể của bạn.
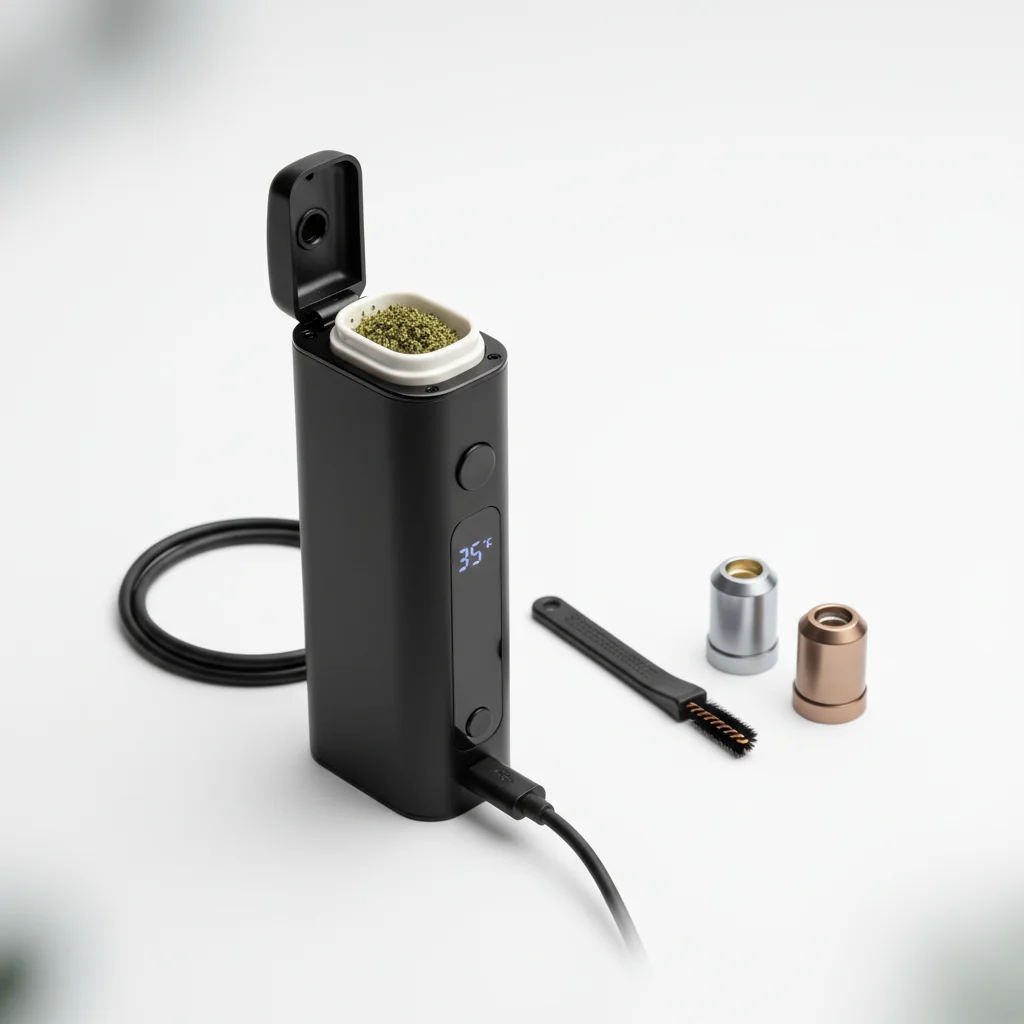
Công cụ và Vật liệu Bạn Cần
Trước khi bắt đầu làm sạch máy xông hơi của bạn, hãy thu thập các công cụ và vật liệu sau để quá trình diễn ra suôn sẻ hơn:
- Rượu Isopropyl (90% hoặc cao hơn)
- Bông ngoáy tai hoặc Dụng cụ làm sạch ống
- Bàn chải nhỏ (như bàn chải đánh răng)
- Khăn microfiber
- Nước ấm
- Bát nhỏ
Có những vật dụng này sẽ giúp bạn làm sạch hiệu quả mọi phần của máy xông hơi.
Quy trình Làm sạch Từng Bước
1. Tháo rời Máy xông hơi
Bắt đầu bằng cách cẩn thận tháo rời máy xông hơi của bạn. Tham khảo hướng dẫn của nhà sản xuất nếu bạn không chắc chắn cách tháo rời mẫu máy cụ thể của mình. Thông thường, bạn sẽ cần phải tháo miệng xông, buồng và bất kỳ bộ phận nào có thể tháo rời khác.
2. Làm sạch Miệng xông
- Ngâm: Đặt miệng xông vào bát rượu isopropyl khoảng 20 phút.
- Chà: Sử dụng bông ngoáy tai hoặc bàn chải nhỏ để loại bỏ bất kỳ cặn bẩn cứng đầu nào.
- Rửa: Rửa miệng xông bằng nước ấm và để nó khô hoàn toàn trên một chiếc khăn sạch.
3. Làm sạch Buồng
- Chải: Sử dụng bàn chải nhỏ để loại bỏ bất kỳ hạt bụi nào trong buồng.
- Lau bằng rượu: Ngâm một bông ngoáy tai trong rượu isopropyl và nhẹ nhàng làm sạch các bức tường của buồng.
- Khô: Để buồng khô tự nhiên trước khi lắp ráp lại.
4. Làm sạch Phần Nhiệt
Hãy cẩn thận khi làm sạch phần nhiệt, vì nó có thể rất nhạy cảm. Tránh ngâm nó trong rượu.
- Chải: Nhẹ nhàng chải bỏ bất kỳ cặn bẩn nào.
- Lau: Sử dụng một bông ngoáy tai hơi ẩm với rượu để làm sạch phần nhiệt, đảm bảo không làm ướt quá mức.
5. Lắp ráp lại Máy xông hơi của Bạn
Khi tất cả các bộ phận đã sạch và khô, hãy lắp ráp lại máy xông hơi của bạn. Đảm bảo mỗi thành phần được gắn chắc chắn. Kiểm tra thiết bị để đảm bảo nó hoạt động trơn tru.
Mẹo để Bảo trì Máy xông hơi của Bạn
Bảo trì thường xuyên có thể kéo dài tuổi thọ của máy xông hơi của bạn. Dưới đây là một số mẹo:
- Làm rỗng Buồng: Sau mỗi lần sử dụng, hãy làm rỗng buồng để ngăn ngừa cặn bẩn tích tụ.
- Sử dụng một Máy xay: Sử dụng một máy xay cần sa chất lượng đảm bảo việc đốt cháy đồng đều và ít cặn bã.
- Lưu trữ đúng cách: Giữ máy xông hơi của bạn ở nơi mát mẻ, khô ráo để tránh hư hại do độ ẩm.
Để biết thêm thông tin về cách sử dụng máy xông hơi, hãy xem Hướng dẫn Nhiệt độ Máy xông hơi.
Những sai lầm thường gặp cần tránh
- Sử dụng rượu quá mức: Việc sử dụng rượu quá nhiều có thể làm hỏng một số vật liệu. Sử dụng một cách tiết kiệm và rửa sạch kỹ lưỡng.
- Không làm khô hoàn toàn: Luôn đảm bảo tất cả các bộ phận hoàn toàn khô trước khi lắp ráp lại để tránh hư hại điện.
- Bỏ qua việc vệ sinh định kỳ: Hãy biến việc vệ sinh thành một phần thường xuyên trong thói quen xông hơi của bạn để tránh tích tụ quá mức.
Kết luận
Một máy xông hơi sạch sẽ là chìa khóa để tận hưởng hương vị và hiệu ứng đầy đủ của cần sa. Bằng cách làm theo các bước được nêu trong hướng dẫn này và duy trì lịch trình vệ sinh định kỳ, bạn có thể đảm bảo thiết bị của mình hoạt động tối ưu và bền lâu. Để biết thêm mẹo về cách chọn máy xông hơi phù hợp hoặc hiểu sự khác biệt giữa máy xông hơi thảo mộc khô và tinh chất, hãy khám phá các hướng dẫn khác của chúng tôi. Chúc bạn xông hơi vui vẻ!
Frequently Asked Questions
Bạn nên vệ sinh máy hút thuốc của mình sau mỗi vài lần sử dụng để duy trì hiệu suất và hương vị tối ưu. Bảo trì thường xuyên cũng có thể kéo dài tuổi thọ của thiết bị.
Related Guides

510 Thread Batteries: Complete Guide to Vape Pen Batteries
Everything you need to know about 510 thread batteries for vape cartridges. Learn about voltage settings, battery types, features to look for, and how to choose the right battery for your cartridges.
Best Vaporizer Temperature Settings: Effects at Each Level
Comprehensive guide about best vaporizer temperature settings: effects at each level. Learn everything you need to know with expert tips and detailed instructions.

Conduction vs Convection Vaporizers: Heating Methods Explained
Understand the difference between conduction and convection heating in vaporizers. Learn how each method affects flavor, vapor quality, efficiency, and which is best for your vaping style.