
Cách Cuốn Một Điếu Thuốc Hoàn Hảo Dành Cho Người Mới Bắt Đầu: Hướng Dẫn Từng Bước 2026
Mike Rodriguez
Rolling Expert
Cách Cuốn Một Điếu Thuốc Hoàn Hảo Dành Cho Người Mới Bắt Đầu: Hướng Dẫn Từng Bước 2026
Cuốn một điếu thuốc là một kỹ năng cơ bản về cần sa có vẻ đáng sợ nhưng trở nên tự nhiên với thực hành. Theo các nhà giáo dục về cần sa, người trung bình đạt được kết quả nhất quán sau 10-15 lần thực hành. Hướng dẫn toàn diện năm 2026 này sẽ dẫn bạn qua từng bước cuốn một điếu thuốc cổ điển, từ việc chọn giấy và chuẩn bị bộ lọc đến việc niêm phong cuối cùng. Với kỹ thuật đúng và một chút kiên nhẫn, bạn sẽ cuốn được những điếu thuốc nhất quán, có thể hút trong thời gian ngắn.
Hướng Dẫn Liên Quan: Trước khi bắt đầu, hãy xem các hướng dẫn của chúng tôi về cách chọn [máy xay](https://guides.munchmakers.com/guide/grinder-maintenance-schedule) và cách chọn [giấy cuốn](https://guides.munchmakers.com/guide/best-rolling-papers-beginners) để có kết quả tốt nhất.
Câu Trả Lời Nhanh
Để cuốn một điếu thuốc: tạo một bộ lọc gấp hình accordion, xay cần sa của bạn đều, đặt bộ lọc vào giấy, phân phối cần sa dọc theo nếp gấp, định hình thành hình trụ bằng cách cuốn qua lại, gập mép không có keo dưới cần sa, cuốn lên đến dải keo, liếm và niêm phong. Cần thực hành nhưng hầu hết mọi người có thể cuốn một điếu thuốc có thể hút trong 3-5 lần thử.
Hướng Dẫn Video
Xem hướng dẫn hình ảnh từng bước này để thấy toàn bộ quá trình cuốn trong hành động:
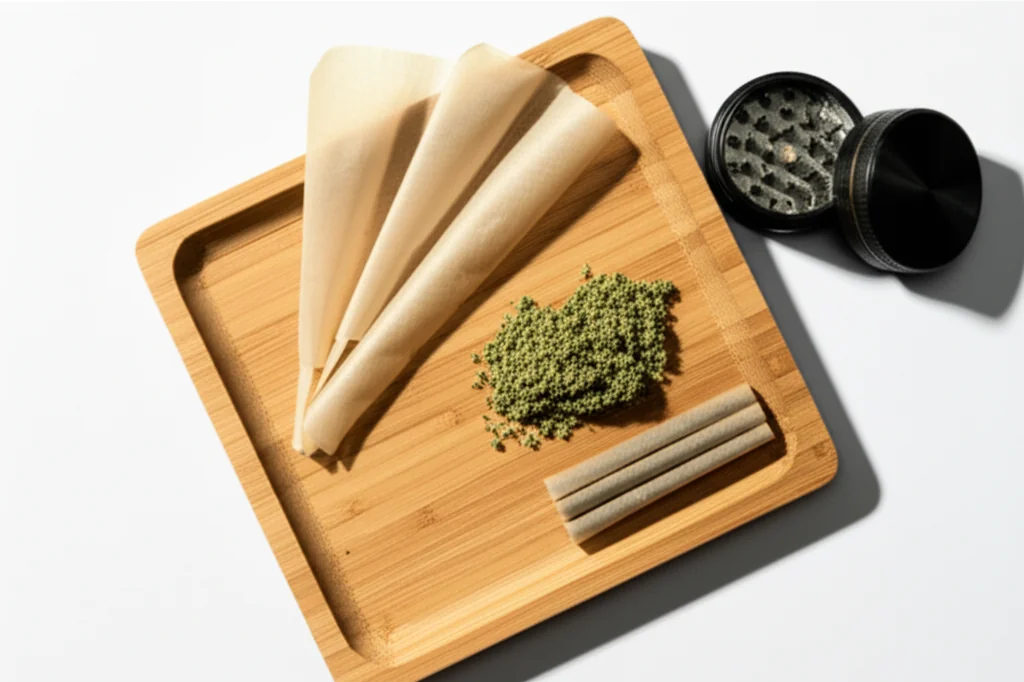
Những gì bạn cần
Cần thiết:
- Giấy cuốn (kích thước 1¼ được khuyến nghị cho người mới bắt đầu)
- Cần sa xay (0.5-0.75 gram)
- Mút lọc (bìa mỏng, có thể dùng thẻ doanh nghiệp)
- Máy xay (hoặc dùng tay nếu cần)
- Bật lửa
Khuyến nghị:
- Khay cuốn (hoặc sách/tạp chí sạch)
- Bút hoặc dụng cụ đóng gói
- Giấy thêm để thực hành
Lựa chọn giấy cho người mới bắt đầu
Để có nguyên liệu cuốn cao cấp, hãy xem giấy cuốn tùy chỉnh từ MunchMakers. Để có mẹo về kỹ thuật cuốn chung, wikiHow cung cấp hướng dẫn minh họa.
Lựa chọn tốt nhất cho năm 2026:
- RAW Organic Hemp - Tự nhiên, dễ làm việc, dễ tha thứ cho người mới bắt đầu. Được khuyến nghị nhiều nhất bởi các nhà giáo dục cần sa để học tập.
- Elements Rice Papers - Mỏng nhưng chắc chắn, cháy chậm, ít can thiệp vào hương vị
- Zig-Zag 1¼ - Cổ điển, dễ tìm, giá cả phải chăng. Tiêu chuẩn ngành trong nhiều thập kỷ.
- OCB Organic - Siêu mỏng, keo tự nhiên, được ưa chuộng bởi những người cuốn có kinh nghiệm
Kích thước: Bắt đầu với 1¼ (78mm). Kích thước King có thể khó khăn cho việc học. Mẹo từ chuyên gia: Giấy nhỏ hơn buộc phát triển kỹ thuật tốt hơn.
Tìm hiểu thêm: Xem hướng dẫn toàn diện của chúng tôi về giấy cuốn tốt nhất cho người mới bắt đầu để có so sánh chi tiết.
Quy trình cuốn từng bước
Bước 1: Chuẩn bị mút lọc của bạn
Mút lọc (còn gọi là crutch hoặc tip) cung cấp cấu trúc, ngăn cần sa vào miệng bạn, và cho bạn thứ gì đó để cầm.
Cách gấp:
1. Xé hoặc cắt giấy lọc thành khoảng 1/2 inch rộng, 2 inch dài
2. Ở một đầu, gấp qua lại 3-4 lần (mẫu accordion)
3. Cuộn phần còn lại của giấy quanh accordion
4. Nên có hình trụ với đường kính bằng bút chì
Tại sao accordion lại quan trọng: Cung cấp sự ổn định và luồng không khí. Nếu không có nó, bộ lọc có thể bị sập khi hút.
Bước 2: Xay cần sa của bạn
Nhận định từ chuyên gia: Độ đồng nhất của việc xay là yếu tố số 1 ảnh hưởng đến chất lượng cháy. Những người cuốn chuyên nghiệp nhấn mạnh rằng việc xay đúng cách quan trọng hơn cả kỹ thuật cuốn.
Sử dụng một máy xay chất lượng để đạt được kết cấu đồng nhất, xốp:
- Không quá mịn: Kết cấu giống bột sẽ kéo qua giấy và hạn chế luồng không khí. Gây ra những cú hút khó chịu.
- Không quá thô: Những mảnh lớn tạo ra cục và cháy không đều. Tạo ra "runners" hoặc "canoes."
- Vừa phải: Những mảnh xốp, đều giống như kết cấu của oregano khô. Nên giữ hình dạng khi bị ép.
Loại bỏ cuống: Chúng tạo ra lỗ trong điếu thuốc và có vị khó chịu. Ngay cả những cuống nhỏ cũng ảnh hưởng đến chất lượng cháy.
Số lượng: 0.5-0.75 gram cho một điếu thuốc tiêu chuẩn. Tốt hơn là bắt đầu nhỏ hơn - bạn luôn có thể cuốn thêm một cái nữa.
Khuyến nghị máy xay: Một máy xay 4 mảnh chất lượng với [kief catcher](https://munchmakers.com/blog/the-ultimate-guide-to-weed-grinders-with-kief-catchers-2/) đảm bảo kết quả đồng nhất. Xem hướng dẫn của chúng tôi về máy xay tốt nhất cho cần sa hoặc duyệt qua máy xay cao cấp tại MunchMakers.
Bước 3: Tạo nếp gấp
Giữ giấy với dải keo ở trên cùng, hướng về phía bạn. Đặt bộ lọc đã chuẩn bị của bạn ở một đầu (thường là đầu bên trái cho người thuận tay phải).
Tạo một kênh: Nhẹ nhàng gấp giấy theo chiều dài để tạo thành hình chữ V nhẹ hoặc rãnh. Nếp gấp này sẽ giữ cần sa của bạn và làm cho việc cuốn dễ dàng hơn.
Bước 4: Đổ cần sa đã xay vào
Phân phối cần sa đã xay đều dọc theo nếp gấp:
- Nhiều hơn ở giữa, thu hẹp một chút về phía các đầu
- Để lại khoảng trống ở dải keo và gần bộ lọc
- Đừng đổ quá đầy - ít hơn thì dễ cuốn hơn nhiều
Sai lầm phổ biến: Nạp quá nhiều cần sa. Bạn luôn có thể cuốn một điếu thuốc thứ hai. Những điếu thuốc quá đầy gần như không thể cuốn đúng cách cho người mới bắt đầu.
Bước 5: Tạo hình điếu thuốc
Đây là nơi kỹ năng cuốn phát triển:
Động tác:
- Kẹp giấy giữa ngón cái và ngón trỏ ở cả hai bên cần sa
- Cuốn qua lại nhẹ nhàng (KHÔNG cuốn sang hai bên - động tác qua lại)
- Cần sa nên được nén và tạo hình thành hình trụ
- Bộ lọc giúp duy trì hình dạng ở đầu đó
Mục tiêu: Hình trụ cần sa được nén đều, chắc chắn nhưng không bị nén quá mức.
Thời gian cần thiết: 15-30 giây để tạo hình. Đừng vội vàng.
Bước 6: Gấp (Bước quan trọng)
Đây là nơi hầu hết người mới bắt đầu gặp khó khăn. Gấp quyết định thành công hay thất bại.
Cách gấp:
1. Làm từ đầu bộ lọc (dễ hơn)
2. Gấp cạnh dưới của giấy (bên không có keo) dưới cần sa và qua bộ lọc
3. Sử dụng ngón cái để gấp trong khi ngón trỏ tạo áp lực nhẹ xuống
4. Khi đã bắt đầu, gấp nên tiếp tục dọc theo chiều dài khi bạn cuốn
Cảm giác: Bạn nên cảm thấy giấy bắt dưới cần sa. Nếu không gấp được, hãy tạo hình cần sa chặt hơn.
Vấn đề phổ biến: Giấy gấp chồng lên nhau mà không bắt dưới cần sa. Giải pháp: Nén cần sa chặt hơn thành hình trụ trước.
Bước 7: Cuốn đến dải keo
Khi đã bắt đầu gấp:
1. Tiếp tục cuốn lên trên với áp lực đều
2. Giấy nên quấn quanh hình trụ cần sa
3. Cuốn cho đến khi chỉ còn dải keo lộ ra
4. Giữ độ căng đồng đều dọc theo toàn bộ chiều dài
Kiểm tra: Trước khi niêm phong, nhìn dọc theo chiều dài. Nó nên đều, không bị lồi hay lỏng.
Bước 8: Niêm phong điếu thuốc
Liếm keo:
- Liếm toàn bộ dải keo một cách hào phóng (đừng ngại ngùng)
- Một số loại giấy cần độ ẩm nhiều hơn những loại khác
- Bắt đầu từ một đầu và làm việc đến đầu kia
- Ấn chặt khi bạn niêm phong
- Giữ điếu thuốc đã niêm phong trong 5-10 giây
Lựa chọn hiện đại: Một số người sử dụng khăn ẩm thay vì liếm để đảm bảo vệ sinh.
Bước 9: Đóng gói và Hoàn thiện
Đóng gói đầu mở:
- Sử dụng bút, que nhỏ hoặc ngón tay út của bạn
- Nhẹ nhàng nén cần sa từ đầu mở
- Điều này làm chặt toàn bộ điếu thuốc và đảm bảo cháy đều
- Đừng nén quá mạnh khiến không khí không lưu thông
Đóng đầu điếu:
- Vặn giấy thừa lại (phương pháp cổ điển)
- Hoặc để mở và cẩn thận đốt bỏ phần thừa khi châm lửa
- Đầu vặn ngăn cần sa rơi ra ngoài
Bước 10: Kiểm tra chất lượng
Một điếu thuốc tốt:
- Chắc chắn nhưng không cứng như đá
- Độ dày đều dọc theo chiều dài
- Có thể hút không khí dễ dàng
- Hoàn toàn kín không có khoảng trống
- Lọc an toàn và không xoay
Nếu không đạt yêu cầu, hãy kiểm tra: Hãy hút nó dù sao! "Xấu nhưng vẫn hoạt động" dạy bạn nhiều hơn là vứt bỏ.
Vấn đề và Giải pháp Thường gặp khi Cuốn
Vấn đề: Điếu thuốc bị lồi/lồi lõm
Nguyên nhân: Phân bố cần sa không đều hoặc không định hình đủ trước khi cuốn.
Giải pháp: Dành nhiều thời gian hơn cho Bước 5 để định hình. Phân phối lại cần sa nếu cần trước khi gấp lại.
Vấn đề: Điếu thuốc quá lỏng, bị rơi ra
Nguyên nhân: Không đủ lực khi cuốn, hoặc quá đầy.
Giải pháp: Sử dụng ít cần sa hơn lần sau. Áp dụng áp lực đồng đều hơn trong quá trình cuốn.
Vấn đề: Điếu thuốc quá chặt, không hút được
Nguyên nhân: Cần sa bị nén hoặc nén quá chặt.
Giải pháp: Nén nhẹ nhàng hơn. Kiểm tra độ hút trước khi niêm phong - nên có không khí dễ dàng.
Vấn đề: Giấy bị rách trong quá trình cuốn
Nguyên nhân: Áp lực quá nhiều, tay khô, hoặc giấy kém chất lượng.
Sửa: Sử dụng chạm nhẹ hơn. Làm ẩm đầu ngón tay một chút. Mua giấy tốt hơn.
Vấn đề: Bộ lọc rơi ra
Nguyên nhân: Bộ lọc quá nhỏ hoặc không được tích hợp đúng cách vào cuộn.
Sửa: Tăng đường kính của bộ lọc một chút. Đảm bảo nó được cuộn VÀO trong khớp, không chỉ đặt ở cuối.
Vấn đề: Hình nón thay vì hình trụ
Nguyên nhân: Có nhiều cần sa ở một đầu hơn đầu kia.
Sửa: Điều này thực sự không sao! Khớp hình nón rất phổ biến (đầu to, đầu bộ lọc hẹp). Nhiều người thích hình dạng này.
Vấn đề: Khớp chạy hoặc hình thuyền
Nguyên nhân: Đóng gói không đều hoặc gió khi hút.
Sửa: Tập trung vào việc phân phối đều ở Bước 4. Xoay khớp khi châm lửa để đảm bảo cháy đều.
Mẹo cuốn từ các chuyên gia
Mẹo 1: Bắt đầu với nhiều giấy hơn bạn nghĩ
Người mới thường sử dụng giấy quá nhỏ. Kích thước 1¼ cho bạn không gian để làm việc.
Mẹo 2: Thực hành với thuốc lá hoặc thảo mộc trước
Một số người thực hành kỹ thuật cuốn với thuốc lá rẻ tiền hoặc thảo mộc khô trước khi "lãng phí" cần sa. Phát triển trí nhớ cơ bắp.
Mẹo 3: Sử dụng phương pháp cuốn bằng tờ đô la
Đặt bộ lọc và cần sa vào một tờ đô la, tạo hình, sau đó trượt giấy vào tờ đô la và sử dụng tờ đô la làm hướng dẫn cuốn. Bánh xe tập cho việc học.
Mẹo 4: Có sẵn hình nón đã làm sẵn
Không có gì xấu khi sử dụng hình nón đã cuốn sẵn mà bạn chỉ cần đổ đầy. Nhiều người cuốn có kinh nghiệm sử dụng chúng để đảm bảo tính nhất quán.
Mẹo 5: 10 cái đầu tiên sẽ xấu
Chấp nhận rằng những nỗ lực ban đầu sẽ chỉ có thể sử dụng được. Cuốn khớp là một kỹ năng cần thực hành. Số 15-20 là khi hầu hết mọi người đạt được tính nhất quán.
Những điều cần cân nhắc nâng cao
Tác động của loại giấy
Giấy gai: Cháy chậm, đều. Hương vị tự nhiên. Đủ dày để dễ sử dụng.
Giấy gạo: Rất mỏng. Hương vị sạch hơn. Ít dễ sử dụng hơn cho người mới.
Bột gỗ: Giấy cổ điển. Cháy nhanh hơn. Hương vị mạnh.
Cuốn mà không có bộ lọc
Một số người thích khớp không có bộ lọc. Bóp chặt đầu lại hoặc gập lại. Cung cấp luồng không khí tốt hơn một chút nhưng yêu cầu hút cẩn thận để tránh cần sa rơi vào miệng.
Phương Pháp Hình Nón
Thay vì hình trụ, hãy cố tình tạo hình nón (rộng ở đầu, hẹp ở bộ lọc). Nhiều người thấy điều này dễ hơn. Đổ nhiều cần sa vào đầu rộng, tạo ra độ thu hẹp tự nhiên.
Luyện Tập Để Hoàn Hảo
Thời Gian Thực Tế:
- Bài Thuốc 1-3: Có thể xấu, có thể hút được
- Bài Thuốc 4-7: Có chức năng, đang cải thiện
- Bài Thuốc 8-15: Có thể hút một cách nhất quán
- Bài Thuốc 15+: Phát triển phong cách cá nhân của bạn
Đừng bỏ cuộc! Ngay cả những người cuốn có kinh nghiệm cũng nhớ đã gặp khó khăn ban đầu. Đây là một kỹ năng thể chất giống như buộc dây giày - có vẻ không thể cho đến khi bỗng nhiên nó trở nên dễ dàng.
Các Lựa Chọn Thay Thế Cho Cuốn Bằng Tay
Hình Nón Đã Cuốn Sẵn:
- Mua giấy đã được tạo hình sẵn
- Chỉ cần đổ cần sa đã xay vào
- Đóng gói và xoắn
- Kết quả nhất quán mỗi lần
- Tìm hiểu thêm: Xem so sánh hình nón đã cuốn sẵn và cuốn bằng tay
Máy Cuốn:
- Thiết bị $5-10 cuốn cho bạn
- Cho giấy và cần sa vào, xoay tay cầm
- Hình trụ hoàn hảo nhưng kém thỏa mãn hơn so với cuốn bằng tay
- Các lựa chọn tốt nhất: Xem hướng dẫn cuốn thuốc lá
Hỏi Ai Đó Cuốn:
- Không có gì xấu hổ khi nhờ một người bạn có kinh nghiệm cuốn cho bạn trong khi học
- Theo dõi kỹ thuật của họ
Mẹo Chuyên Gia Để Có Kết Quả Tốt Hơn
Từ Những Người Cuốn Chuyên Nghiệp (Phiên Bản 2026):
1. Nhiệt độ quan trọng: Bàn tay ấm, khô sẽ hoạt động tốt nhất. Bàn tay lạnh hoặc ẩm ướt làm giấy dính một cách khó chịu.
2. Kỹ thuật thắp sáng ảnh hưởng đến chất lượng cuốn: Ngay cả một điếu thuốc cuốn tốt nhất cũng cần ánh sáng phù hợp. Hãy thắp sáng đầu điếu trong khi xoay để đảm bảo cháy đều.
3. Bảo quản lưu trữ: Những điếu thuốc cuốn đúng cách có thể được lưu trữ trong nhiều tháng. Tìm hiểu về kỹ thuật lưu trữ cần sa để giữ cho những điếu thuốc cuốn sẵn luôn tươi mới.
4. Nâng cấp thiết lập của bạn: Đầu tư vào một khay cuốn chất lượng để tổ chức vật liệu của bạn và ngăn ngừa lãng phí.
Kỹ thuật cuốn liên quan
Khi bạn đã thành thạo điếu thuốc cuốn cơ bản, hãy khám phá những kỹ thuật nâng cao này:
- Cách cuốn điếu thuốc hình chóp - Hình dạng thuôn cho những cú hút mượt mà hơn
- Cuốn ngược (Kiểu Hà Lan) - Ít giấy hơn, hương vị sạch hơn
- Cách cuốn một [Điếu thuốc chéo](https://guides.munchmakers.com/guide/how-to-roll-cross-joint) - Kỹ thuật nâng cao cho những dịp đặc biệt
- Cuốn không có bộ lọc - Phương pháp truyền thống
Mua sắm vật liệu chất lượng: Duyệt qua giấy cuốn tùy chỉnh, máy xay cao cấp, và phụ kiện cuốn tại MunchMakers.
Hướng dẫn này chỉ dành cho mục đích giáo dục ở những khu vực mà cần sa là hợp pháp. Luật cần sa khác nhau theo từng khu vực. Luôn kiểm tra quy định địa phương.
Step 1:
Step 2:
Step 3:
Step 4:
Step 5:
Step 6:
Step 7:
Step 8:
Frequently Asked Questions
Giấy kích thước 1¼ (78mm) là lý tưởng cho người mới bắt đầu. Chúng đủ lớn để làm việc nhưng không quá lớn để lãng phí cần sa. Kích thước King có thể gây áp lực cho những lần thử đầu tiên.
Chặt nhưng không nén. Bạn nên có thể hít không khí dễ dàng trước khi châm lửa. Quá chặt sẽ hạn chế luồng không khí và làm khó hút. Quá lỏng thì cháy quá nhanh và có thể bị rơi ra.
Thường là do đóng gói quá chặt (hạn chế oxy) hoặc cần sa quá ẩm. Đảm bảo đóng gói đều, vừa phải và sử dụng cần sa đã được xử lý đúng cách, khô ráo.
0.5-1 gram là tiêu chuẩn. Người mới bắt đầu nên bắt đầu với 0.5g, đủ cho 2-3 người hoặc nhiều phiên hút một mình.
Related Guides
Rolling Paper Sizes Explained: 1 1/4, King Size, and More
Comprehensive guide about rolling paper sizes explained: 1 1/4, king size, and more. Learn everything you need to know with expert tips and detailed instructions.

Best Rolling Papers for Beginners: Complete Buying Guide 2026
Discover the best rolling papers for beginners including RAW, Zig-Zag, and OCB. Learn about sizes, materials (rice vs hemp vs wood pulp), and which papers are easiest to roll with.
Clear Rolling Papers: Are Cellulose Papers Worth It?
Comprehensive guide about clear rolling papers: are cellulose papers worth it?. Learn everything you need to know with expert tips and detailed instructions.