
วิธีขจัดคราบเรซินที่ดื้อรั้นออกจากแก้ว
Emma Chen
Glass Specialist
วิธีขจัดคราบเรซินที่ดื้อรั้นออกจากแก้ว
การทำความสะอาดแอลกอฮอล์และเกลือทั่วไปจะจัดการกับการสะสมส่วนใหญ่ แต่คราบบางตัวก็ต้านทานวิธีการมาตรฐาน ไม่ว่าคุณจะกำลังฟื้นฟูชิ้นโปรดหรือทำความสะอาดชิ้นใหม่แก้ว [ โถจาก Munchmakers](https://munchmakers.com/product-category/glass-stash-jars/) คู่มือนี้ครอบคลุมเทคนิคขั้นสูงในการขจัดคราบเรซินที่ดื้อรั้น การเปลี่ยนสี และการสะสมตัวจากแก้วที่ไม่สามารถทำความสะอาดได้ตามปกติ
คำตอบอย่างรวดเร็ว
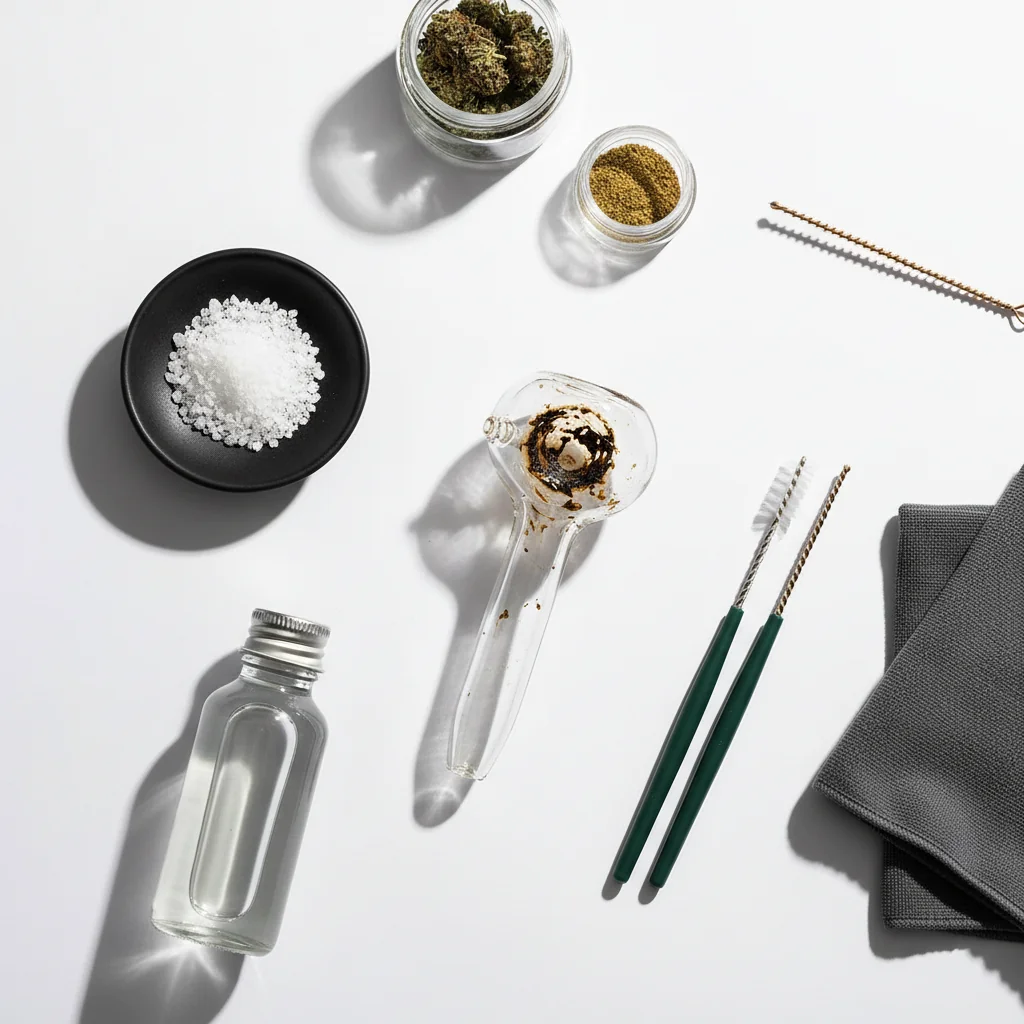
สำหรับคราบที่ดื้อรั้น: แช่น้ำร้อนก่อนแช่น้ำร้อน (15-20 นาที) ให้สะเด็ดน้ำและเติมไอโซโพรพิลแอลกอฮอล์ 91%+ ข้ามคืน (8-12 ชั่วโมง) เติมเกลือหยาบและเขย่าแรงๆ ขัดด้วยน้ำยาทำความสะอาดท่อ ทำซ้ำหากจำเป็น สำหรับกรณีที่รุนแรง ให้ลองใช้ IPA 99%, อะซิโตน (ล้างให้สะอาด) หรือน้ำยาทำความสะอาดสำหรับงานหนักในเชิงพาณิชย์
ทำไมคราบบางอย่างถึงไม่ออกมา
สาเหตุของการย้อมสีดื้อ:
- เรซินเก่า: เรซินทิ้งพันธะนานเกินไปกับแก้ว
- การสัมผัสความร้อน: อบเรซินอุ่นซ้ำบนพื้นผิว
- แหล่งน้ำกระด้าง: แร่ธาตุรวมกับเรซินเพื่อการสะสมที่แข็งแรงขึ้น
- รอยขีดข่วนพื้นผิว: อนุภาคเรซินดักจับไมโคร
- การทำความสะอาดก่อนหน้านี้ไม่เพียงพอ: ทำความสะอาดบางส่วน leaves ฐานชั้น
การป้องกันง่ายกว่าการกำจัด: การทำความสะอาดเป็นประจำช่วยป้องกันการสะสมตัวที่ดื้อรั้น
ที่สมาคมป้องกันอัคคีภัยแห่งชาติ (NFPA)แนะนำการระบายอากาศที่เหมาะสมและการป้องกันอัคคีภัยเมื่อใช้ตัวทำละลายทำความสะอาดที่ติดไฟได้ เช่น ไอโซโพรพิลแอลกอฮอล์
ระดับ 1: การทำความสะอาดมาตรฐานที่เพิ่มขึ้น
ก่อนที่จะเพิ่มวิธีการที่รุนแรงขึ้น ให้ลองใช้การทำความสะอาดขั้นพื้นฐานที่ได้รับการปรับปรุง:
น้ำร้อนก่อนการบำบัด
1. เติมน้ำประปาร้อน (ไม่เดือด)
2. ปล่อยให้นั่ง 15-20 นาที
3. ระบายน้ำออกจนหมด
4. เติมแอลกอฮอล์ทันที (ก่อนทำความเย็น)
ทำไมมันถึงได้ผล: ความร้อนทำให้เรซินอ่อนตัวลง ทำให้ละลายได้ในแอลกอฮอล์มากขึ้น
แช่แอลกอฮอล์แบบขยาย
การทำความสะอาดแบบมาตรฐานใช้การแช่ 15-30 นาที สำหรับคราบสกปรก:
1. เติมไอโซโพรพิลแอลกอฮอล์ 91% +
2. เปิดปิดเพื่อป้องกันการระเหย
3. แช่ค้างคืน (8-12 ชั่วโมง)
4. ใส่เกลือหลังจากแช่แล้วเขย่า
5. ล้างออกให้สะอาด
คราบที่ดื้อรั้นส่วนใหญ่ให้ผลผลิตเพื่อยืดเวลาการแช่
เขย่าตัวแรงมากขึ้น
หลังจากแช่:
- เติมเกลือมากกว่าปกติ (4-5 ช้อนโต๊ะ)
- ปิดช่องเปิดหลายชั้น
- เขย่าเป็นเวลา 5-10 นาที (ไม่ใช่ 2-3)
- ให้เกลือขัดขณะพักเขย่าอีกครั้ง
ระดับ 2: วิธีการกำจัดทางกายภาพ
เมื่อแช่น้ำเพียงอย่างเดียวไม่ได้ผล ให้เพิ่มการขัดทางกายภาพ:
น้ำยาทำความสะอาดท่อสำหรับพื้นที่แคบ
- ใช้น้ำยาทำความสะอาดท่อจุ่มแอลกอฮอล์
- ขัดบริเวณรอยเปื้อนโดยตรง
- ดัดน้ำยาให้ถึงมุม
- ผ่านจุดด่างดำหลายจุด
แปรงขวดสำหรับพื้นที่กว้าง
- ใช้แปรงขนนุ่มเท่านั้น
- ห้ามใช้แปรงโลหะหรือขัดถู (กระจกขูด)
- ขัดถูเป็นวงกลม
- ใช้แรงกดที่มั่นคงและอ่อนโยน
สำลีก้านสำหรับงานรายละเอียด
- เหมาะสำหรับชามและพื้นที่ขนาดเล็ก
- จุ่มแอลกอฮอล์ สครับจุดด่าง
- เปลี่ยนไม้กวาดบ่อยๆ
- ดีต่อคราบภายนอกด้วย
วิธีการ "เติมและนั่ง"
สำหรับผู้ต้มน้ำ คุณจะเข้าถึงไม่ได้:
1. เติมแอลกอฮอล์และเกลือ
2. ชิ้นมุมเพื่อให้เกลือวางอยู่บนพื้นที่เปื้อน
3. ปล่อยให้นั่ง 30 นาที
4. หมุนไปมุมต่างๆ
5. ทำซ้ำจนกว่าทุกพื้นที่จะได้รับการรักษา
ระดับ 3: ตัวทำละลายที่แข็งแกร่งขึ้น
เมื่อวิธีการมาตรฐานล้มเหลว ให้พิจารณาตัวเลือกเหล่านี้:
ไอโซโพรพิลแอลกอฮอล์ 99%
แข็งแกร่งกว่า 91%:
- ปริมาณน้ำน้อย = พลังการทำความสะอาดที่มากขึ้น
- การดำเนินการที่เร็วขึ้นบนเรซิน
- มีจำหน่ายที่ร้านอิเล็กทรอนิกส์หรือทางออนไลน์
- ใช้วิธีเดียวกับ 91%
อะซิโตน (ใช้อย่างระมัดระวัง)
ข้อดี:
- ก้าวร้าวมากกว่าไอโซโพรพิล
- เหมาะสำหรับคราบสกปรกมาก
- ปลอดภัยสำหรับกระจก
ข้อเสีย:
- เป็นพิษมากขึ้น
- กลิ่นแรงกว่า
- ต้องล้างออกให้สะอาด
- ไม่ใช่สำหรับซิลิโคน พลาสติก หรือยาง
วิธีใช้:
1. ทำงานในบริเวณที่มีอากาศถ่ายเทสะดวก
2. เติมอะซิโตน
3. แช่ 30-60 นาที
4. ใส่เกลือเขย่าๆ
5. ล้างอย่างน้อย 5 ครั้งด้วยน้ำร้อน
6. ปล่อยให้อากาศแห้งสนิทก่อนใช้งาน
น้ำยาทำความสะอาดสำหรับงานหนักเชิงพาณิชย์
ผลิตภัณฑ์สำหรับการสะสมตัวมาก:
- กรันจ์ออฟซุปเปอร์แช่
- 420 น้ำยาทำความสะอาด (ความแรงเดิม)
- เจลทำความสะอาดความละเอียด
ค่าใช้จ่ายเหล่านี้มากขึ้นแต่เป็นสูตรสำหรับคราบที่ดื้อรั้น
ระดับ 4: เทคนิคขั้นสูง
สำหรับชิ้นส่วนที่ต่อต้านทุกสิ่งทุกอย่าง:
วิธีแช่สองชั้น
1. แช่น้ำครั้งแรก: น้ำร้อน (20 นาที)
2. แช่ที่สอง: 99% IPA ข้ามคืน
3. เกลือเชค
4. แช่ตัวที่สาม: IPA สด (4 ชั่วโมง)
5. เกลือเชคสุดท้ายและล้างออก
วิธีแอลกอฮอล์อุ่น (ระวัง!)
การเตือน: แอลกอฮอล์ติดไฟได้ ไม่เคยให้ความร้อนโดยตรง
วิธีการอุ่นที่ปลอดภัย:
1. เติมน้ำร้อน (อ่างน้ำ)
2. ใส่ถุงแอลกอฮอล์ที่ปิดสนิทลงในน้ำ
3. ปล่อยให้แอลกอฮอล์อุ่น (5 นาที)
4. เทแอลกอฮอล์อุ่น ๆ ลงในชิ้น
5. แช่และเขย่าตามปกติ
แอลกอฮอล์อุ่นทำงานเร็วขึ้นแต่ต้องใช้ความระมัดระวัง
วงจรการแช่แข็ง-ละลาย
ความร้อนช็อกสามารถช่วยคลายเรซินเก่า:
1. ชิ้นสะอาดตามปกติ
2. ใส่ในช่องแช่แข็ง (2 ชั่วโมง)
3. ถอดออก ให้อุ่นถึงอุณหภูมิห้อง
4. เติมน้ำร้อนทันที
5. ระบายและทำความสะอาดด้วยแอลกอฮอล์
อุณหภูมิที่เปลี่ยนแปลงสามารถจับเรซินจับกระจกได้
สถานการณ์พิเศษ
คราบน้ำแข็ง+เรซิ่น
หากคุณมีทั้งสองอย่าง:
1. ทำความสะอาดเรซินก่อน (แอลกอฮอล์ + เกลือ)
2 . แล้วบำบัดน้ำกระด้างด้วยน้ำส้มสายชูขาว
3. น้ำส้มสายชูละลายแหล่งแร่
4. ล้างครั้งสุดท้าย
เครื่องต้มเปื้อน
ทำความสะอาดยากที่สุด:
- การแช่ตัวแบบขยายเป็นเครื่องมือที่ดีที่สุดของคุณ
- เขย่าด้วยชิ้นส่วนที่ทำมุมในทิศทางต่างๆ
- ใช้น้ำยาทำความสะอาดท่อบางๆ
- ความอดทน—อาจต้องใช้หลายรอบ
คราบสกปรกภายนอก
นอกชิ้นส่วนสกปรกเกินไป:
- เช็ดด้วยผ้าชุบแอลกอฮอล์
- ใช้เมจิกยางลบ (อ่อนโยน) จุดด่าง
- ล้างออกเพื่อขจัดสิ่งตกค้าง
เมื่อใดควรยอมรับ "สะอาดเพียงพอ"
แก้วบางชิ้นไม่สามารถคืนค่าได้อย่างสมบูรณ์:
สัญญาณของความเสียหายถาวร:
- มองเห็นรอยเปื้อนหลังจากทำความสะอาดรอบลึก 3+
- การเปลี่ยนสีที่ไม่เปลี่ยนแปลงด้วยการทำความสะอาด
- พื้นผิวรู้สึกหยาบเมื่อมีคราบ
- ความขุ่นมัวที่ยังคงมีอยู่
สิ่งนี้เกิดขึ้นเมื่อ:
- เรซินถูกทิ้งไว้นานเกินไป
- แก้วมีคุณภาพเก่าหรือต่ำกว่า
- พื้นผิวถูกขูดและกับดักวัสดุ
ตัวเลือก:
- ยอมรับการเปลี่ยนสีบ้าง
- เปลี่ยนชิ้น
- ใช้บ่อยขึ้นเพื่อป้องกันการนั่ง
เคล็ดลับการป้องกัน
หลีกเลี่ยงคราบสกปรกในตอนแรก:
ทำความสะอาดเป็นประจำ
- เปลี่ยนน้ำทุกวัน
- ทำความสะอาดแอลกอฮอล์รายสัปดาห์
- อย่าปล่อยให้สะสมสะสม
ล้างหลังเซสชั่น
- ล้างน้ำร้อนอย่างรวดเร็ว
- ขจัดเรซินสดก่อนที่จะแข็งตัว
ใช้หน้าจอ
- ลดเรซินเข้าชิ้น
- โดยรวมน้อยลง
เก็บของแห้ง
- ความชื้น + เรซิน = สร้างยากขึ้น
- น้ำเปล่าเมื่อไม่ใช้งาน
ตารางการทำความสะอาดตามแนวโน้มการย้อมสี
หากชิ้นส่วนของคุณเปื้อนได้ง่าย:
- ทำความสะอาด 2x ต่อสัปดาห์ (ไม่ใช่รายสัปดาห์)
- ล้างออกอย่างรวดเร็วหลังทุกเซสชั่น
- ใช้น้ำร้อนเพื่อล้าง
- พิจารณากระจกคุณภาพสูง (รูพรุนน้อยกว่า)
หากคุณไม่สอดคล้องกับการทำความสะอาด:
- ยอมรับว่าจำเป็นต้องทำความสะอาดอย่างล้ำลึกเป็นครั้งคราว
- เก็บอะซิโตนไว้กับเคสที่ไม่ดี
- งบประมาณสำหรับชิ้นส่วนทดแทน
สรุป: เส้นทางการยกระดับ
เริ่มแช่แอลกอฮอล์แบบขยาย (ข้ามคืน) →ถ้าล้มเหลวเพิ่มการเขย่าแบบก้าวร้าว + ขัด →ยังดื้อลอง 99% IPA หรืออะซิโตน →ทางเลือกสุดท้ายน้ำยาทำความสะอาดมืออาชีพหรือยอมรับการย้อมสีถาวร
ชิ้นส่วนส่วนใหญ่จะสะอาดอย่างสมบูรณ์ด้วยวิธีการระดับ 1 หรือ 2 ระดับ 3 และ 4 มีไว้สำหรับชิ้นส่วนที่ถูกละเลยอย่างแท้จริง
คู่มือนี้มีไว้เพื่อการศึกษา กฎหมายกัญชาแตกต่างกันไปตามเขตอำนาจศาล
Step 1:
Step 2:
Step 3:
Step 4:
Step 5:
Frequently Asked Questions
คราบเก่ามากสามารถฝังลงในแก้วเมื่อเวลาผ่านไป หากการย้อมสีไม่ดีขึ้นหลังจากทำความสะอาดอย่างล้ำลึก 3 รอบ การเปลี่ยนสีอาจเป็นความเสียหายของพื้นผิวถาวรมากกว่าเรซินที่ถอดออกได้
Related Guides
Best Bong Cleaning Solutions: DIY vs Commercial Products
Comprehensive guide about best bong cleaning solutions: diy vs commercial products. Learn everything you need to know with expert tips and detailed instructions.

Cannabis Accessory Cleaning Schedule: Daily, Weekly, Monthly
Create the perfect cleaning routine for all your cannabis accessories. Learn what needs daily attention, weekly cleaning, and monthly deep cleaning for optimal hygiene.

How to Clean Pipe Screens and Bowl Pieces
Learn proper techniques for cleaning metal and glass screens, bowl pieces, and downstems. Restore airflow and extend the life of your smoking accessories.