
วิธีการม้วนจอยที่สมบูรณ์แบบสำหรับผู้เริ่มต้น: คู่มือทีละขั้นตอน 2026
Mike Rodriguez
Rolling Expert
วิธีการม้วนจอยที่สมบูรณ์แบบสำหรับผู้เริ่มต้น: คู่มือทีละขั้นตอน 2026
การม้วนจอย เป็นทักษะพื้นฐานในการใช้กัญชาที่ดูน่ากลัว แต่จะกลายเป็นธรรมชาติเมื่อฝึกฝน ตามที่ผู้สอนกัญชา คนทั่วไปจะได้ผลลัพธ์ที่สม่ำเสมอหลังจากการฝึกฝน 10-15 ครั้ง คู่มือที่ครอบคลุมในปี 2026 นี้จะพาคุณผ่านทุกขั้นตอนของการม้วนจอยคลาสสิก ตั้งแต่การเลือกกระดาษและการเตรียมฟิลเตอร์ไปจนถึงการปิดผนึกขั้นสุดท้าย ด้วยเทคนิคที่ถูกต้องและความอดทนเล็กน้อย คุณจะสามารถม้วนจอยที่สามารถสูบได้อย่างสม่ำเสมอในเวลาไม่นาน
คู่มือที่เกี่ยวข้อง: ก่อนที่คุณจะเริ่ม ตรวจสอบคู่มือของเราเกี่ยวกับ การเลือก [เครื่องบด](https://guides.munchmakers.com/guide/grinder-maintenance-schedule) และ การเลือก [กระดาษม้วน](https://guides.munchmakers.com/guide/best-rolling-papers-beginners) เพื่อผลลัพธ์ที่ดีที่สุด
คำตอบด่วน
ในการม้วนจอย: สร้างฟิลเตอร์ที่พับเป็นรูปพัด บดกัญชาให้สม่ำเสมอ วางฟิลเตอร์ในกระดาษ แจกจ่ายกัญชาตามรอยพับ รูปร่างให้เป็นทรงกระบอกโดยการม้วนไปมา ซ่อนขอบที่ไม่มีกาวใต้กัญชา ม้วนขึ้นไปยังแถบกาว เลียและปิดผนึก ใช้การฝึกฝน แต่คนส่วนใหญ่สามารถม้วนจอยที่สามารถสูบได้ภายใน 3-5 ครั้ง
วิดีโอสอน
ดูคู่มือภาพทีละขั้นตอนนี้เพื่อดูขั้นตอนการม้วนทั้งหมดในขณะทำงาน:
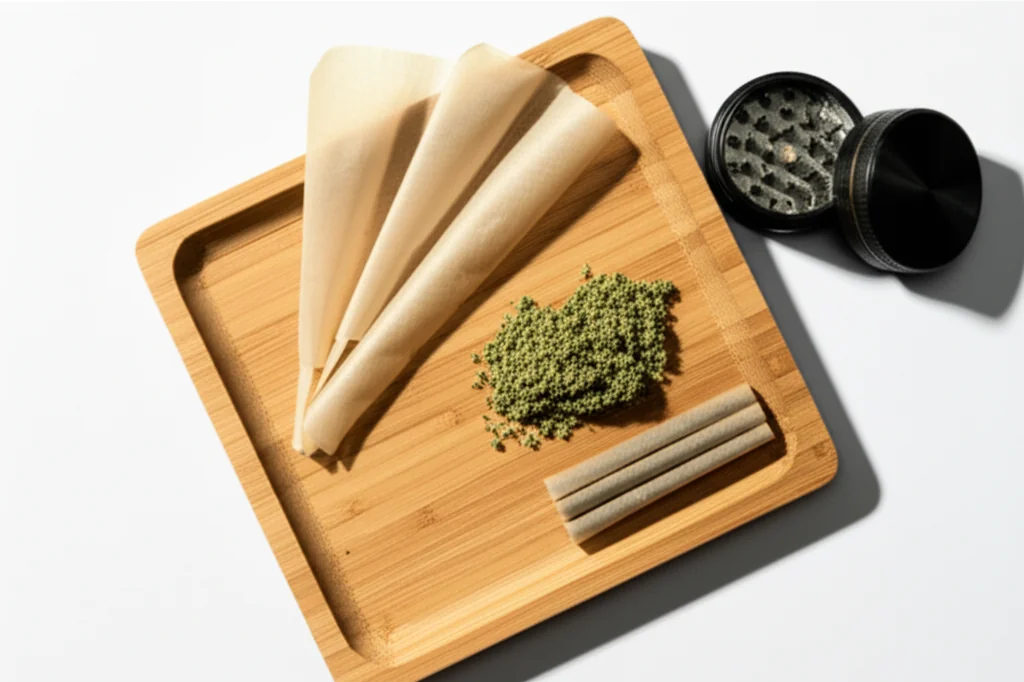
สิ่งที่คุณต้องการ
สิ่งที่จำเป็น:
- กระดาษม้วน (ขนาด 1¼ แนะนำสำหรับผู้เริ่มต้น)
- กัญชาบด (0.5-0.75 กรัม)
- ปลายกรอง (การ์ดบาง, สามารถใช้บัตรธุรกิจได้)
- เครื่องบด (หรือใช้มือถ้าจำเป็น)
- ไฟแช็ก
สิ่งที่แนะนำ:
- ถาดม้วน (หรือหนังสือ/นิตยสารที่สะอาด)
- ปากกา หรือเครื่องมือบรรจุ
- กระดาษเพิ่มเติมสำหรับฝึกฝน
การเลือกกระดาษสำหรับผู้เริ่มต้น
สำหรับอุปกรณ์ม้วนคุณภาพสูง, ตรวจสอบ กระดาษม้วนแบบกำหนดเองจาก MunchMakers. สำหรับเคล็ดลับเทคนิคการม้วนทั่วไป, wikiHow มีคู่มือภาพประกอบ.
ตัวเลือกที่ดีที่สุดสำหรับปี 2026:
- RAW Organic Hemp - ธรรมชาติ, ทำงานง่าย, ยืดหยุ่นสำหรับผู้เริ่มต้น. ได้รับการแนะนำมากที่สุดโดยผู้สอนกัญชาเพื่อการเรียนรู้.
- Elements Rice Papers - บางแต่แข็งแรง, เผาได้ช้า, รบกวนรสชาติขั้นต่ำ
- Zig-Zag 1¼ - คลาสสิก, หาซื้อได้ทั่วไป, ราคาไม่แพง. มาตรฐานอุตสาหกรรมมาหลายทศวรรษ.
- OCB Organic - บางพิเศษ, ยางธรรมชาติ, เป็นที่ชื่นชอบของผู้ม้วนที่มีประสบการณ์
ขนาด: เริ่มต้นด้วยขนาด 1¼ (78 มม.). ขนาดคิงอาจจะยุ่งยากสำหรับการเรียนรู้. เคล็ดลับจากผู้เชี่ยวชาญ: กระดาษที่เล็กกว่าจะช่วยพัฒนาทักษะได้ดีกว่า.
เรียนรู้เพิ่มเติม: ตรวจสอบคู่มือที่ครอบคลุมของเราเกี่ยวกับ กระดาษม้วนที่ดีที่สุดสำหรับผู้เริ่มต้น สำหรับการเปรียบเทียบรายละเอียด.
ขั้นตอนการม้วนแบบทีละขั้นตอน
ขั้นตอนที่ 1: เตรียมปลายกรองของคุณ
ปลายกรอง (เรียกอีกอย่างว่าหลอดหรือปลาย) ให้โครงสร้าง, ป้องกันไม่ให้กัญชาเข้าปากของคุณ, และให้สิ่งที่คุณสามารถจับได้.
วิธีพับ:
1. ฉีกหรือใช้กรรไกรตัดกระดาษกรองให้กว้างประมาณ 1/2 นิ้ว ยาว 2 นิ้ว
2. ที่ปลายด้านหนึ่ง พับไปมา 3-4 ครั้ง (รูปแบบพับแบบอะคอร์เดียน)
3. ม้วนกระดาษที่เหลือรอบๆ รูปแบบอะคอร์เดียน
4. ควรมีลักษณะเป็นทรงกระบอก ขนาดเส้นผ่านศูนย์กลางประมาณดินสอ
ทำไมรูปแบบอะคอร์เดียนถึงสำคัญ: ช่วยให้มีความเสถียรและการไหลเวียนของอากาศ หากไม่มีมัน ตัวกรองอาจพังขณะสูบ
ขั้นตอนที่ 2: บดกัญชา
ข้อมูลจากผู้เชี่ยวชาญ: ความสม่ำเสมอในการบดเป็นปัจจัยอันดับ 1 ที่มีผลต่อคุณภาพการเผาไหม้ ผู้ม้วนมืออาชีพเน้นว่าการบดที่เหมาะสมสำคัญกว่าทักษะการม้วนเอง
ใช้เครื่องบดคุณภาพดีเพื่อให้ได้เนื้อสัมผัสที่สม่ำเสมอและฟู:
- ไม่ละเอียดเกินไป: ความละเอียดเหมือนผงจะดึงผ่านกระดาษและจำกัดการไหลเวียนของอากาศ ทำให้เกิดการสูบที่รุนแรง
- ไม่หยาบเกินไป: ก้อนใหญ่จะสร้างก้อนและการเผาไหม้ที่ไม่สม่ำเสมอ ทำให้เกิด "รันเนอร์" หรือ "เรือแคนู"
- พอดี: ชิ้นส่วนฟูและสม่ำเสมอคล้ายกับเนื้อสัมผัสของออริกาโนแห้ง ควรคงรูปเมื่อถูกกด
เอาก้านออก: มันสร้างรูในมวนและมีรสชาติที่รุนแรง แม้แต่ก้านเล็กๆ ก็มีผลต่อคุณภาพการเผาไหม้
ปริมาณ: 0.5-0.75 กรัมสำหรับมวนมาตรฐาน เริ่มต้นด้วยปริมาณน้อยดีกว่า - คุณสามารถม้วนอีกอันได้เสมอ
คำแนะนำเครื่องบด: เครื่องบด 4 ชิ้นคุณภาพดีที่มี [ที่เก็บคีฟ](https://munchmakers.com/blog/the-ultimate-guide-to-weed-grinders-with-kief-catchers-2/) จะช่วยให้ได้ผลลัพธ์ที่สม่ำเสมอ ดูคู่มือของเราเกี่ยวกับ เครื่องบดที่ดีที่สุดสำหรับกัญชา หรือเรียกดู เครื่องบดพรีเมียมที่ MunchMakers .ขั้นตอนที่ 3: สร้างรอยพับ
ถือกระดาษโดยมีแถบกาวอยู่ด้านบนหันเข้าหาคุณ วางกรองที่เตรียมไว้ที่ปลายด้านหนึ่ง (โดยปกติคือด้านซ้ายสำหรับคนถนัดขวา)
สร้างช่อง:
พับกระดาษเบาๆ ตามยาวเพื่อสร้างรูป V เล็กน้อยหรือร่อง รอยพับนี้จะช่วยเก็บกัญชาและทำให้การม้วนง่ายขึ้น ขั้นตอนที่ 4: เติมกัญชาที่บดแล้ว
กระจายกัญชาที่บดแล้วให้สม่ำเสมอไปตามรอยพับ:
มากกว่าที่กลาง
- , ค่อยๆ แคบลงไปที่ปลายเว้นที่ว่าง
- ที่แถบกาวและใกล้กรอง อย่าเติมมากเกินไป
- Don't overfill - น้อยกว่าง่ายกว่าการม้วนมาก
ข้อผิดพลาดทั่วไป: การใส่กัญชามากเกินไป คุณสามารถม้วนบุหรี่กัญชาอีกอันได้เสมอ บุหรี่ที่เต็มเกินไปแทบจะเป็นไปไม่ได้สำหรับผู้เริ่มต้นที่จะม้วนให้ถูกต้อง
ขั้นตอนที่ 5: รูปร่างของบุหรี่
นี่คือจุดที่ทักษะการม้วนพัฒนา:
การเคลื่อนไหว:
- บีบกระดาษระหว่างนิ้วโป้งและนิ้วชี้ทั้งสองข้างของกัญชา
- ม้วนไปมาอย่างเบา ๆ (ไม่ใช่ไปด้านข้าง - การเคลื่อนไหวไปมา)
- กัญชาควรจะถูกบรรจุและรูปทรงเป็นทรงกระบอก
- ตัวกรองช่วยรักษารูปร่างที่ปลายด้านนั้น
เป้าหมาย: ทรงกระบอกของกัญชาที่บรรจุอย่างสม่ำเสมอแน่นแต่ไม่แน่นเกินไป
เวลาที่ต้องใช้: 15-30 วินาทีในการสร้างรูปทรง อย่ากดดันตัวเอง
ขั้นตอนที่ 6: การพับ (ขั้นตอนสำคัญ)
นี่คือจุดที่ผู้เริ่มต้นส่วนใหญ่ประสบปัญหา การพับกำหนดความสำเร็จหรือความล้มเหลว
วิธีการพับ:
1. เริ่มจากปลายตัวกรอง (ง่ายกว่า)
2. พับขอบล่างของกระดาษ (ด้านที่ไม่มีกาว) ใต้กัญชาและเหนือกรอง
3. ใช้นิ้วโป้งพับในขณะที่นิ้วชี้กดลงเบา ๆ
4. เมื่อเริ่มแล้ว การพับควรดำเนินต่อไปตามความยาวขณะที่คุณม้วน
ความรู้สึก: คุณควรรู้สึกว่ากระดาษจับอยู่ใต้กัญชา หากมันไม่พับ ให้ปรับรูปทรงของกัญชาให้แน่นขึ้น
ปัญหาทั่วไป: กระดาษพับทับตัวเองโดยไม่จับอยู่ใต้กัญชา วิธีแก้ไข: บรรจุกัญชาให้แน่นขึ้นในรูปทรงกระบอกก่อน
ขั้นตอนที่ 7: ม้วนไปยังแถบกาว
เมื่อเริ่มการพับ:
1. ดำเนินการม้วนขึ้นโดยใช้แรงกดที่สม่ำเสมอ
2. กระดาษควรพันรอบทรงกระบอกของกัญชา
3. ม้วนจนกระทั่งแค่แถบกาวที่แสดง
4. รักษาความตึงเครียดให้สม่ำเสมอตลอดความยาวทั้งหมด
ตรวจสอบ: ก่อนที่จะปิดผนึก มองไปตามความยาว มันควรจะเรียบ ไม่เป็นก้อนหรือหลวม
ขั้นตอนที่ 8: ปิดผนึกบุหรี่
การเลียกาว:
- เลียแถบกาวทั้งหมดอย่างเอื้อเฟื้อ (อย่าขี้อาย)
- กระดาษบางชนิดต้องการความชื้นมากกว่ากระดาษอื่น ๆ
- เริ่มจากปลายด้านหนึ่งและทำงานไปยังอีกด้านหนึ่ง
- กดแน่นขณะที่คุณปิดผนึก
- ถือบุหรี่ที่ปิดผนึกไว้ 5-10 วินาที
ทางเลือกสมัยใหม่: บางคนใช้ผ้าชุบน้ำแทนการเลียเพื่อสุขอนามัย
ขั้นตอนที่ 9: บรรจุและเสร็จสิ้น
การบรรจุปลายเปิด:
- ใช้ปากกา ไม้เล็ก หรือปลายนิ้วก้อยของคุณ
- บรรจุกัญชาลงจากปลายเปิดอย่างเบา ๆ
- จะทำให้ทั้งมวนแน่นขึ้นและช่วยให้เผาไหม้สม่ำเสมอ
- อย่าบรรจุแน่นเกินไปจนทำให้การไหลของอากาศถูกจำกัด
การปิดปลาย:
- บิดกระดาษส่วนเกินให้ปิด (วิธีคลาสสิก)
- หรือปล่อยให้เปิดและเผาส่วนเกินอย่างระมัดระวังเมื่อจุดไฟ
- ปลายบิดช่วยป้องกันไม่ให้กัญชาหลุดออก
ขั้นตอนที่ 10: ตรวจสอบคุณภาพ
มวนที่ดี:
- แน่นแต่ไม่แข็งเหมือนหิน
- มีความหนาสม่ำเสมอตลอดความยาว
- สามารถดูดอากาศได้ง่าย
- ปิดสนิทไม่มีช่องว่าง
- ฟิลเตอร์แน่นและไม่หมุน
ถ้ามันล้มเหลวให้ตรวจสอบ: สูบมันไปเถอะ! "ไม่สวยแต่ใช้งานได้" สอนคุณได้มากกว่าการทิ้งมันไป
ปัญหาการมวนทั่วไปและวิธีแก้ไข
ปัญหา: มวนเป็นก้อน/ไม่สม่ำเสมอ
สาเหตุ: การกระจายกัญชาไม่สม่ำเสมอหรือการจัดรูปทรงไม่เพียงพอก่อนการมวน
วิธีแก้: ใช้เวลาในการจัดรูปทรงในขั้นตอนที่ 5 ให้มากขึ้น หากจำเป็นให้กระจายกัญชาใหม่ก่อนที่จะพับ
ปัญหา: มวนหลวมเกินไป หลุดออก
สาเหตุ: ไม่มีแรงตึงเพียงพอเมื่อมวน หรือเติมมากเกินไป
วิธีแก้: ใช้กัญชาน้อยลงในครั้งถัดไป ใช้แรงกดที่สม่ำเสมอมากขึ้นในระหว่างการมวน
ปัญหา: มวนแน่นเกินไป ไม่สามารถดูดได้
สาเหตุ: กัญชาถูกบีบอัดหรือบรรจุแน่นเกินไป
วิธีแก้: บรรจุอย่างเบา ๆ ทดสอบการดูดก่อนปิด - ควรมีการไหลของอากาศที่ง่าย
ปัญหา: กระดาษขาดระหว่างการมวน
สาเหตุ: แรงกดมากเกินไป มือแห้ง หรือกระดาษคุณภาพต่ำ
แก้ไข: ใช้การสัมผัสที่อ่อนโยนกว่า ชื้นปลายนิ้วเล็กน้อย ซื้อกระดาษที่ดีกว่า.
ปัญหา: ตัวกรองหลุดออก
สาเหตุ: ตัวกรองเล็กเกินไปหรือไม่ถูกติดตั้งอย่างถูกต้องในม้วน.
แก้ไข: ทำให้ตัวกรองมีเส้นผ่านศูนย์กลางใหญ่ขึ้นเล็กน้อย ตรวจสอบให้แน่ใจว่ามันถูกม้วนเข้าไปในม้วน ไม่ใช่แค่วางไว้ที่ปลาย.
ปัญหา: รูปกรวยแทนที่จะเป็นทรงกระบอก
สาเหตุ: มีกัญชามากกว่าที่ปลายด้านหนึ่งมากกว่าด้านอื่น.
แก้ไข: นี่จริงๆ แล้วใช้ได้ดี! ม้วนกรวยเป็นที่นิยม (ปลายหนา, ปลายกรองแคบ). หลายคนชอบรูปทรงนี้.
ปัญหา: ม้วนไหม้หรือมีรู
สาเหตุ: การบรรจุไม่สม่ำเสมอหรือมีลมขณะสูบ.
แก้ไข: มุ่งเน้นการกระจายอย่างสม่ำเสมอในขั้นตอนที่ 4 หมุนม้วนขณะจุดไฟเพื่อให้แน่ใจว่ามีการไหม้ที่สม่ำเสมอ.
เคล็ดลับการม้วนจากผู้เชี่ยวชาญ
เคล็ดลับ 1: เริ่มต้นด้วยกระดาษมากกว่าที่คุณคิด
ผู้เริ่มต้นมักใช้กระดาษที่เล็กเกินไป ขนาด 1¼ ให้พื้นที่ในการทำงาน.
เคล็ดลับ 2: ฝึกฝนด้วยยาสูบหรือสมุนไพรก่อน
บางคนฝึกเทคนิคการม้วนด้วยยาสูบราคาถูกหรือสมุนไพรแห้งก่อนที่จะ "เปลือง" กัญชา ช่วยพัฒนาหน่วยความจำกล้ามเนื้อ.
เคล็ดลับ 3: ใช้วิธีการม้วนด้วยธนบัตรดอลลาร์
วางตัวกรองและกัญชาในธนบัตรดอลลาร์ รูปร่าง จากนั้นเลื่อนกระดาษเข้าไปในธนบัตรและใช้ธนบัตรเป็นแนวทางในการม้วน. เหมือนล้อฝึกสำหรับการเรียนรู้.
เคล็ดลับ 4: มีกรวยสำเร็จรูป
ไม่มีความอายในการใช้ กรวยที่ม้วนไว้ล่วงหน้า ที่คุณแค่เติมเข้าไป หลายคนที่มีประสบการณ์ใช้มันเพื่อความสม่ำเสมอ.
เคล็ดลับ 5: 10 ครั้งแรกจะดูไม่สวย
ยอมรับว่าความพยายามในช่วงแรกจะทำงานได้ดีที่สุดเท่านั้น การม้วนเป็นทักษะที่ต้องฝึกฝน หมายเลข 15-20 คือช่วงที่คนส่วนใหญ่สามารถทำให้สม่ำเสมอได้.
ข้อพิจารณาขั้นสูง
ผลกระทบของประเภทกระดาษ
กระดาษกัญชา: เผาไหม้ช้าและสม่ำเสมอ รสชาติธรรมชาติ หนาเพียงพอที่จะให้อภัย.
กระดาษข้าว: บางมาก รสชาติสะอาด ให้อภัยน้อยกว่าสำหรับผู้เริ่มต้น.
เยื่อไม้: กระดาษคลาสสิก เผาไหม้เร็ว รสชาติแรง.
การม้วนโดยไม่มีตัวกรอง
บางคนชอบม้วนที่ไม่มีตัวกรอง บีบปลายให้ปิดหรือพับมันให้ทับกัน ช่วยให้มีการไหลของอากาศที่ดีกว่าเล็กน้อยแต่ต้องระมัดระวังในการสูบเพื่อหลีกเลี่ยงกัญชาหลุดเข้าไปในปาก.
วิธีกรวย
แทนที่จะใช้ทรงกระบอก ให้ตั้งใจทำเป็นทรงกรวย (กว้างที่ปลาย แคบที่ตัวกรอง) หลายคนพบว่านี่ง่ายกว่า เติมที่ปลายกว้างด้วยกัญชามากขึ้นเพื่อสร้างการเทที่เป็นธรรมชาติ
การฝึกฝนทำให้สมบูรณ์แบบ
ระยะเวลาที่สมจริง:
- มวน 1-3: น่าจะดูแย่ แต่สามารถสูบได้
- มวน 4-7: ใช้งานได้ดีขึ้นเรื่อยๆ
- มวน 8-15: สามารถสูบได้อย่างสม่ำเสมอ
- มวน 15+: พัฒนาสไตล์ส่วนตัวของคุณ
อย่ายอมแพ้! แม้แต่ผู้ที่มีประสบการณ์ในการมวนก็ยังจำได้ว่าต้องดิ้นรนในตอนแรก มันเป็นทักษะทางกายภาพเหมือนการผูกเชือกรองเท้า - ดูเหมือนจะเป็นไปไม่ได้จนกระทั่งมันเกิดขึ้นอย่างกะทันหัน
ทางเลือกแทนการมวนด้วยมือ
กรวยที่ม้วนล่วงหน้า:
- ซื้อกระดาษที่ถูกจัดรูปไว้แล้ว
- เพียงแค่เติมด้วยกัญชาที่บดแล้ว
- บรรจุและบิด
- ผลลัพธ์ที่สม่ำเสมอทุกครั้ง
- เรียนรู้เพิ่มเติม: ดูที่ การเปรียบเทียบกรวยที่ม้วนล่วงหน้ากับการมวนด้วยมือ
เครื่องมวน:
- $5-10 อุปกรณ์ที่ม้วนให้คุณ
- โหลดกระดาษและกัญชา หมุนด้าม
- ทรงกระบอกที่สมบูรณ์แบบ แต่ไม่พอใจเท่าการมวนด้วยมือ
- ตัวเลือกที่ดีที่สุด: ดูที่ คู่มือการมวน
ขอให้ใครสักคนมวนให้:
- ไม่มีความอายในการให้เพื่อนที่มีประสบการณ์มวนให้คุณในขณะที่เรียนรู้
- ดูเทคนิคของพวกเขาอย่างใกล้ชิด
เคล็ดลับจากผู้เชี่ยวชาญเพื่อผลลัพธ์ที่ดีกว่า
จากผู้มวนมืออาชีพ (ฉบับปี 2026):
1. อุณหภูมิมีความสำคัญ: มือที่อบอุ่นเล็กน้อยและแห้งทำงานได้ดีที่สุด มือเย็นหรือชื้นทำให้กระดาษติดอย่างไม่สะดวก
2. เทคนิคการจุดไฟมีผลต่อคุณภาพการมวน: แม้แต่บุหรี่ที่ม้วนอย่างดีที่สุดก็ต้องการการจุดไฟที่เหมาะสม จุดไฟที่ปลายขณะหมุนเพื่อให้มีการเผาไหม้ที่สม่ำเสมอ
3. การเก็บรักษา: บุหรี่ที่ม้วนอย่างถูกต้องสามารถเก็บไว้ได้นานหลายเดือน เรียนรู้เกี่ยวกับ เทคนิคการเก็บรักษากัญชา เพื่อให้บุหรี่ม้วนสำเร็จรูปสดใหม่
4. อัปเกรดการตั้งค่า: ลงทุนใน ถาดม้วนคุณภาพ เพื่อจัดระเบียบวัสดุของคุณและป้องกันการสูญเสีย
เทคนิคการม้วนที่เกี่ยวข้อง
เมื่อคุณเชี่ยวชาญในการม้วนบุหรี่พื้นฐานแล้ว ให้สำรวจเทคนิคขั้นสูงเหล่านี้:
- วิธีการม้วนบุหรี่แบบกรวย - รูปทรงเรียวเพื่อการสูบที่นุ่มนวลขึ้น
- การม้วนแบบกลับด้าน (สไตล์ดัตช์) - ใช้กระดาษน้อยลง รสชาติสะอาดกว่า
- วิธีการม้วน [Cross Joint](https://guides.munchmakers.com/guide/how-to-roll-cross-joint) - เทคนิคขั้นสูงสำหรับโอกาสพิเศษ
- การม้วนโดยไม่ใช้ฟิลเตอร์ - วิธีการแบบดั้งเดิม
ช้อปอุปกรณ์คุณภาพ: เรียกดู กระดาษม้วนแบบกำหนดเอง, เครื่องบดพรีเมียม, และ อุปกรณ์ม้วน ที่ MunchMakers.
คู่มือนี้จัดทำขึ้นเพื่อวัตถุประสงค์ทางการศึกษาในพื้นที่ที่กัญชาถูกกฎหมาย กฎหมายเกี่ยวกับกัญชาจะแตกต่างกันไปตามเขตอำนาจศาล ตรวจสอบกฎระเบียบท้องถิ่นเสมอ
Step 1:
Step 2:
Step 3:
Step 4:
Step 5:
Step 6:
Step 7:
Step 8:
Frequently Asked Questions
กระดาษขนาด 1¼ (78 มม.) เป็นขนาดที่เหมาะสำหรับผู้เริ่มต้น มันมีขนาดใหญ่พอที่จะทำงานได้ แต่ไม่ใหญ่จนทำให้คุณสูญเสียกัญชา ขนาดคิงอาจทำให้รู้สึกกลัวในครั้งแรก
Related Guides
Rolling Paper Sizes Explained: 1 1/4, King Size, and More
Comprehensive guide about rolling paper sizes explained: 1 1/4, king size, and more. Learn everything you need to know with expert tips and detailed instructions.

Best Rolling Papers for Beginners: Complete Buying Guide 2026
Discover the best rolling papers for beginners including RAW, Zig-Zag, and OCB. Learn about sizes, materials (rice vs hemp vs wood pulp), and which papers are easiest to roll with.
Clear Rolling Papers: Are Cellulose Papers Worth It?
Comprehensive guide about clear rolling papers: are cellulose papers worth it?. Learn everything you need to know with expert tips and detailed instructions.