
初心者のための完璧な関節を転がす方法: ステップバイステップのチュートリアル 2026
Mike Rodriguez
Rolling Expert
初心者のための完璧な関節を転がす方法: ステップバイステップのチュートリアル 2026
ジョイントを転がすは、威圧的に見えるが、練習すれば自然になる基本的な大麻のスキルです。 大麻の教育者によると、平均的な人は 10 ~ 15 回の練習の試行の後、一貫した結果を達成します。 この包括的な 2026 チュートリアルでは、古典的なジョイントをローリングするすべてのステップを、紙の選択やフィルターの準備から最終的なシールまで説明します。 適切なテクニックと少しの忍耐があれば、すぐに一貫した喫煙可能な関節を回転させることができます。
関連ガイド:始める前に、ガイドをご覧ください適切な選択 [ グラインダー](https://guides.munchmakers.com/guide/grinder-maintenance-schedule) と[選択] ローリングペーパー](https://guides.munchmakers.com/guide/best-rolling-papers-beginners) が最良の結果を得るために。
迅速な答え
ジョイントをロールするには: アコーディオンで折り畳んだフィルターを作成し、大麻を均等に粉砕し、フィルターを紙に配置し、大麻を折り目に沿って配置し、前後に転がして形を円柱に成形し、大麻の下で非ガムの端を大麻の下に押し込み、ガム ストリップまで上に転がし、なめてシールします。 練習は必要ですが、ほとんどの人は 3 ~ 5 回の試行で喫煙可能なジョイントを転がすことができます。
ビデオチュートリアル
この段階的なビジュアル ガイドを見て、ローリング プロセス全体の動作を確認してください。
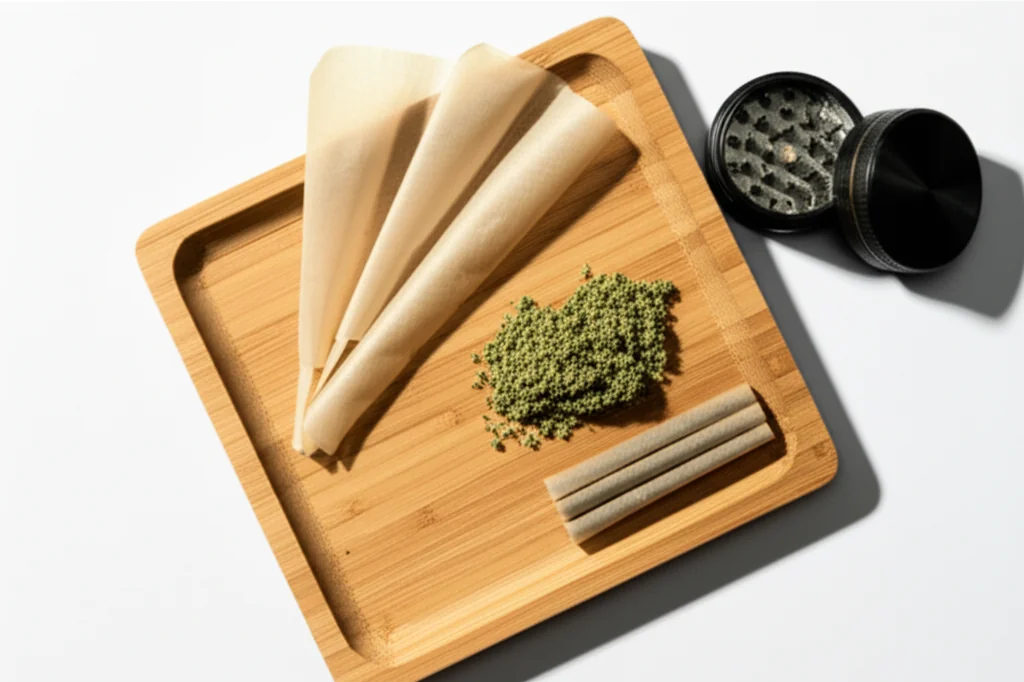
必要なもの
必須:
- ローリングペーパー(初心者におすすめの 1¼ サイズ)
- 大麻を地面に(0.5-0.75 グラム)
- フィルターのヒント(薄い段ボール、名刺を使用できます)
- グラインダー(または必要に応じて指)
- ライター
推奨:
- ローリングトレイ(またはきれいな本/雑誌)
- ペンまたはパッキングツール
- 練習用の追加の書類
初心者向けの用紙選び
プレミアム ローリング用品については、チェックアウトしてくださいムンチメーカーからのカスタムのローリング ペーパー。 一般的なローリング テクニックのヒントについては、wikiHowイラスト付きガイドを提供しています。
2026 年の最良の選択肢:
- 生の有機麻- 自然で作業が簡単で、初心者には寛容です。 大麻教育者が学習に最も推奨しています。
- 要素 ライスペーパー- 薄いが頑丈で、ゆっくり燃焼、味の干渉が最小限
- ジグザグ 1¼- クラシックで広く入手可能で、手頃な価格です。 何十年も業界標準。
- OCB オーガニック- 経験豊富なローラーに好まれる、極薄の天然ゴム
サイズ:1¼ (78mm) から始めます。 キングサイズは学習に使いにくい場合があります。 専門家のヒント: 紙を小さくすると、より優れた技術開発が必要になります。
詳細:の包括的なガイドをご覧ください初心者に最適なローリングペーパー詳細な比較用。
段階的なローリング プロセス
ステップ 1: フィルターのチップを準備する
フィルター (松葉杖または先端とも呼ばれます) は構造を提供し、大麻が口に入るのを防ぎ、何かを保持します。
折り方:
1. ろ紙を幅約 1/2 インチ、長さ 2 インチに切り取るか、切り取る
2です 。 片端で前後に 3 ~ 4 回折りたたむ (アコーディオン パターン)
3. 紙の残りをアコーディオンの周りに転がします
4. 鉛筆の直径の約円柱である必要があります
アコーディオンが重要な理由:安定性と空気の流れを提供します。 それがないと、喫煙中にフィルターが崩れることがあります。
ステップ 2: 大麻を粉砕する
専門家の洞察:研削の一貫性は、火傷の品質に影響を与える最大の要因です。 プロのローラーは、ローリング技術自体よりも適切な研削が重要であることを強調しています。
高品質のグラインダーを使用して、一貫したふわふわしたテクスチャーを実現します。
- あまりにも元気ではありません:粉末状の一貫性が紙を貫通し、空気の流れを制限します。 厳しい打撃を引き起こします。
- 粗すぎない:大きな塊が塊を作り、不均一な燃焼を起こします。 「ランナー」または「カヌー」を作成します。
- ちょうどいい:ふわふわで、乾燥オレガノの食感に似たピース。 押したときに形状を保持する必要があります。
茎を取り除く:ジョイントに穴を開け、味が厳しい。 小さな茎でも火傷の質に影響を与えます。
金額:標準ジョイントの場合は 0.5 ~ 0.75 グラム。 小さく始める方が良いでしょう - いつでも別のロールを転がすことができます。
グラインダーの推奨事項:高品質の 4 ピース グラインダー[ キーフキャッチャー](https://munchmakers.com/blog/the-ultimate-guide-to-weed-grinders-with-kief-catchers-2/) は、一貫した結果を保証します。 のガイドを参照してください大麻に最適なグラインダーまたはブラウズMunchmakers のプレミアム グラインダー.
ステップ 3: 折り目を作成する
紙の上部にガム ストリップを置いて紙を持って、自分を向いてください。 準備したフィルターを一方の端 (通常は右利きの人の場合は左端) に配置します。
チャネルを作成します。紙を縦に折り曲げて、V字型または谷を軽く作ります。 この折り目は大麻を保持し、転がりやすくします。
ステップ 4: 地面の大麻で満たす
地面の大麻を折り目に沿って均等に分配します。
- もっと中盤、端に向かって少し先細りになっています
- スペースを離れるガムストリップと近くのフィルター
- いっぱいにしないでください- 少ない方が転がりやすい
よくある間違い:大麻をロードしすぎています。 いつでも 2 番目のジョイントを転がすことができます。 ジョイントが過剰に充填されたことは、初心者が正しく転がることがほとんど不可能です。
ステップ 5: ジョイントを形作る
ローリングスキルは次のようになります。
モーション:
- 大麻の両側で親指と人差し指の間で紙をつまむ
- ゆっくりと前後に転がり、左右に動かず、前後の動きに合わせて移動します。
- 大麻は詰めてシリンダーに成形する必要があります
- フィルターは、その側の形状を維持するのに役立ちます
目標:しっかりしているが圧縮されていない、大麻の均等に詰め込まれたシリンダー。
必要な時間:15 ~ 30 秒の整形。 急いでください。
ステップ 6: タック (重要なステップ)
これは、ほとんどの初心者が苦労するところです。 タックは成功か失敗かを決定します。
タックする方法:
1. フィルター端からの作業 (簡単)
2です 。 紙の下端 (ガム以外) を大麻の下に押し込み、フィルターの上に置きます
3.人差し指で優しい下に圧力をかけながら、親指を使って押し込みます
4. 開始したら、タックは回転するときに長さに沿って継続する必要があります
感覚:大麻の下で紙のキャッチを感じるはずです。 押し込まれていない場合は、大麻をよりきつく形作ります。
一般的な問題:大麻の下に引っかかることなく、紙が折りたたまれます。 解決策: 大麻を最初にシリンダーの形にきつく詰めてください。
ステップ 7: ガム ストリップに転がします
タックが開始されたら:
1. 均等な圧力を使って上向きに転がり続ける
2です 。 紙は大麻のシリンダーを包み込むべきです
3. ガム ストリップだけが表示されるまで転がします
4.全長に沿って張力を一定に保つ
チェック:封をする前に、長さを見下ろしてください。 ゴツゴツしたり緩んだりしないようにする必要があります。
ステップ 8: ジョイントをシールする
ガムをなめます。
- ガムストリップ全体をたっぷりとなめます(恥ずかしがらないでください)
- 一部の紙は、他の紙よりも多くの水分を必要とします
- 片端から始めて、もう一方の端から作業する
- 密閉するようにしっかりと押してください
- 密閉ジョイントを 5 ~ 10 秒間保持します
現代の代替案:衛生のためになめることの代わりに、湿らせた布を使う人もいます。
ステップ 9: パックして仕上げる
オープンエンドの梱包:
- ペン、小さな棒、または小指を使用してください
- 大麻を開いた端からやさしく詰める
- これにより、関節全体が締め付けられ、燃焼が確実になります
- 空気の流れを制限するほど固く詰め込まないでください
ヒントを閉じる:
- 余分な紙をひねって閉じる (クラシック メソッド)
- または、開いたままにして、照明の際に余分な余分な燃焼を注意深く
- 先端がねじれていると、大麻の脱落を防ぎます
ステップ 10: 品質チェック
良いジョイント:
- しっかりしているが堅固ではない
- 長さに沿って均一な厚さ
- 簡単に空気を抜き取ることができます
- 隙間なく完全に密閉
- フィルターが安全で回転しない
失敗した場合は、次のチェックを行います。とにかく吸ってください! 「醜いが機能的」は、それを捨てる以上のことを教えてくれます。
一般的なローリングの問題と修正
問題: 関節がゴツゴツしているか、でこぼこしています
原因:不均一な大麻の分布または転がる前の成形不十分。
修正:ステップ 5 のシェーピングにより多くの時間を費やしてください。 必要に応じて、大麻を再配布します。
問題: ジョイントが緩すぎてバラバラになってしまう
原因:ローリング時、または過充填時に十分な張力がありません。
修正:次回は大麻を減らす。 ローリング中により一貫した圧力を加えます。
問題: ジョイントがきつく締まっているので、描画されません
原因:圧縮大麻または固すぎます。
修正:より優しく詰めてください。 シール前のテスト ドロー - 簡単な空気の流れがあるはずです。
問題: ローリング中に紙が破れる
原因:圧力が高すぎる、手が乾いている、または低品質の紙。
修正:より優しいタッチを使用してください。 少し指先をしっとりとします。 より良い紙を購入してください。
問題: フィルターが落ちる
原因:フィルターが小さすぎるか、ロールに正しく組み込まれていない。
修正:フィルターを少し大きくします。 端に配置するだけでなく、ジョイントに転がされていることを確認してください。
問題: 円柱ではなく円錐形の形状
原因:一方の端で大麻が多い。
修正:これは実は大丈夫です! コーン ジョイントが人気です (ファット エンド、狭いフィルター エンド)。 多くの人がこの形を好みます。
問題: 共同走行またはカヌー
原因:喫煙中の梱包が不均一または風が吹いています。
修正:ステップ 4 で均一な分布に集中します。照明中にジョイントを回転させ、チェリーも均一にします。
専門家からのローリングのヒント
ヒント 1: 思ったよりも多くの紙から始めます
初心者は、小さすぎる紙を使用することがよくあります。 1¼ サイズで作業の余地があります。
ヒント 2: 最初にタバコまたはハーブを使って練習する
大麻を「無駄にする」前に、安価なタバコや乾燥ハーブを使ったローリング テクニックを練習する人もいます。 筋肉の記憶を発達させます。
ヒント 3: ドル紙幣のローリング方法を使用する
フィルターと大麻をドル紙幣に入れ、形を整え、紙を紙幣にスライドさせて、ローリング ガイドとして使用します。 学習用のトレーニング ホイール。
ヒント 4: 既製のコーンが存在する
使用するのは恥ずかしい事前にロールされたコーンあなたがただ埋めるだけです。 多くの経験豊富なローラーは、一貫性を保つためにそれらを使用しています。
ヒント 5: 最初の 10 人は醜いでしょう
初期の試みはせいぜい機能的であることを受け入れてください。 ジョイントローリングは練習が必要なスキルです。 15-20 という数字は、ほとんどの人が一貫性を達成するときです。
高度な考慮事項
紙の種類の影響
麻の紙:ゆっくり、燃えます。 ナチュラルな味わい 寛容に十分な厚さ。
ライスペーパー:とても薄い。 よりクリーンな味。 初心者にはあまり寛容ではありません。
木材パルプ:古典的な紙。 より速い燃焼。 強い味。
フィルターなしで転がる
フィルタレスジョイントを好む人もいます。 端を閉じるか、折りたたんでください。 少し気流が良くなりますが、口の中で大麻が緩むのを避けるためには、慎重に喫煙する必要があります。
コーン方式
円柱の代わりに、意図的に円錐形を形作ります (先端が広く、フィルターが狭い)。 多くの人はこれを簡単に見つけます。 広い端を大麻で埋めて、自然なテーパーを作ります。
練習は完璧になります
現実的なタイムライン:
- ジョイント 1 ~ 3:おそらく醜い、おそらく喫煙可能
- ジョイント 4-7:機能的、改善
- ジョイント 8-15:一貫して喫煙可能
- ジョイント 15+:個人的なスタイルを開発する
あきらめないでください!経験豊富なローラーでさえ、最初は苦労したことを覚えています。 靴を結ぶような身体能力です。突然カチッと音がするまで不可能に思えます。
手巻きの代替
事前にロールされたコーン:
- すでに形を整えている紙を買う
- 地面の大麻で満たすだけ
- パックとツイスト
- 毎回一貫した結果
- 詳細:私たちを参照してください事前転造コーンと手巻きの比較
ローリングマシン:
- $5-10 のデバイスでロールします。
- 紙と大麻をセットしてハンドルを回す
- シリンダーは完璧ですが、手で転がりするよりも満足度が低いです
- 最良のオプション:チェックアウトジョイントローラーガイド
誰かに転がるように頼む:
- 経験豊富な友人があなたのためにロールしてくれることは恥ずかしいことではありません。
- 彼らのテクニックをよく見てください
より良い結果を得るための専門家のヒント
プロフェッショナル ローラー (2026 年版) より:
1. 温度が重要:少し暖かく、乾いた手が最適に機能します。 冷たいかベタベタした手が紙をぎこちなく動かします。
2. 照明技術はロールの品質に影響します。最もよく巻かれたジョイントでさえ、適切な照明が必要です。 チェリーが均一になるように、回転中に先端を照らします。
3. 保管保存:適切にロールされたジョイントは、数か月間保存できます。 について学ぶ大麻の保管技術事前に転がされた関節を新鮮に保つため。
4. セットアップをアップグレードします。品質に投資するローリングトレイ材料を整理し、無駄を防ぎます。
関連するローリング手法
基本的な共同作業をマスターしたら、次の高度なテクニックを調べてください。
- コーンジョイントを転がす方法- よりスムーズなヒットのためのテーパー形状
- インサイドアウトローリング (オランダ風)- 紙が少なく、よりきれいな味
- [を転がす方法 クロスジョイント](https://guides.munchmakers.com/guide/how-to-roll-cross-joint)- 特別な日のための高度なテクニック
- フィルターなしで転がる- 伝統的な方法
品質の商品を購入する:閲覧するカスタムのローリングペーパー, プレミアムグラインダー、そしてローリングアクセサムンクメーカーで。
このガイドは、大麻が合法である地域での教育目的のものです。 大麻法は法域によって異なります。 常に現地の規制を確認してください。
Step 1:
Step 2:
Step 3:
Step 4:
Step 5:
Step 6:
Step 7:
Step 8:
Frequently Asked Questions
1¼ サイズの紙 (78mm) は、初心者に最適です。 それらは扱うのに十分な大きさですが、大麻を無駄にするほど大きくはありません。 キングサイズは、最初の試みでは怖いかもしれません。
Related Guides
Rolling Paper Sizes Explained: 1 1/4, King Size, and More
Comprehensive guide about rolling paper sizes explained: 1 1/4, king size, and more. Learn everything you need to know with expert tips and detailed instructions.

Best Rolling Papers for Beginners: Complete Buying Guide 2026
Discover the best rolling papers for beginners including RAW, Zig-Zag, and OCB. Learn about sizes, materials (rice vs hemp vs wood pulp), and which papers are easiest to roll with.
Clear Rolling Papers: Are Cellulose Papers Worth It?
Comprehensive guide about clear rolling papers: are cellulose papers worth it?. Learn everything you need to know with expert tips and detailed instructions.