
Cómo hacer rodar una porra perfecta para principiantes: tutorial paso a paso 2026
Mike Rodriguez
Rolling Expert
Cómo hacer rodar una porra perfecta para principiantes: tutorial paso a paso 2026
style="Margin: 1rem 0; line-height: 1.75;">rolling a joint es una habilidad fundamental de cannabis que parece intimidante pero se vuelve natural con la práctica. Según los educadores de cannabis, la persona promedio logra resultados consistentes después de 10-15 intentos de práctica. Este completo tutorial de 2026 lo guía a través de cada paso de rodar una junta clásica, desde la selección de papeles y la preparación de su filtro hasta el sello final. Con la técnica adecuada y un poco de paciencia, estarás rodando porros consistentes y fumables en poco tiempo.
style="Margen: 1rem 0; Altura de línea: 1.75;">Guías relacionadas: Antes de comenzar, consulte nuestras guías en elegir el derecho [ Grinder](https://guides.munchmakers.com/guide/grinder-maintenance-schedule) y seleccionando [papers de rodadura](https://guides.munchmakers.com/guide/best-rolling-papers-principiantes) para obtener los mejores resultados.
respuesta rápida
style="Margen: 1rem 0; Altura de línea: 1.75;">Para rodar un porro: Crea un filtro doblado de acordeón, muela su cannabis de manera uniforme, coloque el filtro en el papel, distribuya el cannabis a lo largo del pliegue, forme un cilindro rodando hacia adelante y hacia atrás, coloque el borde sin encía debajo del cannabis, enrolle hacia arriba hasta la goma de mascar, lamer y sellar. Toma práctica, pero la mayoría de las personas pueden hacer rodar un porro fumable dentro de 3 a 5 intentos.
Vídeo tutorial
style
mirar esta guía visual paso a paso para ver todo el proceso de rodadura en acción:
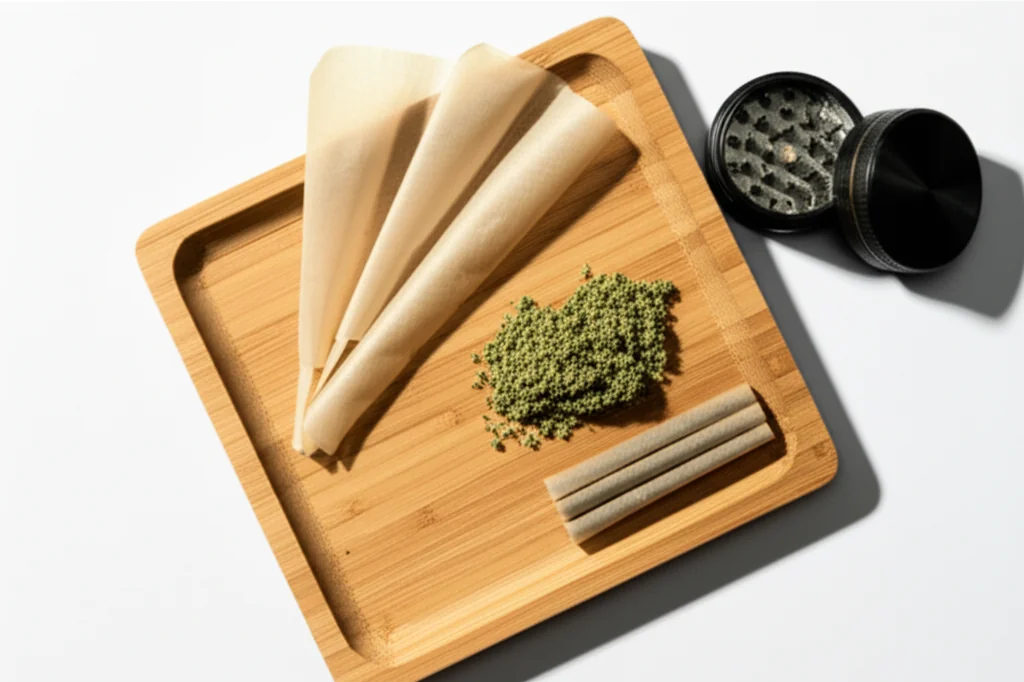
lo que necesitarás
Requerido:
- Papel de liar (Tamaño de 1 ¼ recomendado para principiantes)
- Canabis molido (0.5-0.75 gramos)
- Consejos de filtrado (cartón delgado, puede usar una tarjeta de presentación)
- Grinero (o dedos si es necesario)
- más ligero
Recomendado:
- bandeja de laminación (o book clean/magazine)
- bolígrafo o herramienta de embalaje
- Papeles adicionales para la práctica
Selección de papel para principiantes
style="margin: 1rem 0; line-height: 1.75;">Para obtener suministros de laminación premium, consulte papers de enrollado personalizados de munchmakers. Para obtener consejos generales sobre técnicas de rodadura, wikihow ofrece guías ilustradas.
style
Mejores opciones para 2026:
- Cáñamo orgánico crudo - natural, fácil de trabajar, perdonador para principiantes. Más recomendado por los educadores de cannabis para el aprendizaje.
- Papel de arroz de elementos - delgado pero resistente, lento, interferencia mínima del gusto
- Zig-zag 1¼ - Clásico, ampliamente disponible, asequible. estándar de la industria durante décadas.
- OCB Organic - Encía ultrafina y natural, preferido por rodillos experimentados
style="Margen: 1rem 0; Altura de línea: 1.75;">Tamaño: Comience con 1¼ (78 mm). El tamaño king puede ser difícil de manejar para aprender. Consejo experto: los papeles más pequeños obligan a un mejor desarrollo de la técnica.
style="Margin: 1rem 0; line-height: 1.75;">Más información: Consulte nuestra completa guía en mejores papeles para principiantes para comparaciones detalladas.
Proceso de laminado paso a paso
Paso 1: Prepare su punta de filtro
style="Margen: 1rem 0; Altura de línea: 1.75;">El filtro (también llamado muleta o punta) proporciona estructura, evita que el cannabis entre en la boca y te da algo para sostener.
style
Cómo doblar:
1. Romper o cortar papel de filtro a aproximadamente 1/2 pulgada de ancho, 2 pulgadas de largo
2 . En un extremo, pliegue hacia adelante y hacia atrás 3-4 veces (patrón de acordeón)
3. Enrolle el resto del papel alrededor del acordeón
4. Debe ser un cilindro sobre el diámetro de un lápiz
style="Margen: 1rem 0; Altura de línea: 1.75;">Por qué es importante el acordeón: Proporciona estabilidad y flujo de aire. Sin él, el filtro puede colapsar mientras fuma.
Paso 2: Muele tu cannabis
style="Margen: 1rem 0; Altura de línea: 1.75;">Insight de Expert: La consistencia de molienda es el factor #1 que afecta la calidad de la quema. Los rodillos profesionales enfatizan que el esmerilado adecuado es más importante que la técnica de laminación.
style
Utilice una amoladora de calidad para lograr una textura uniforme y esponjosa:
- No demasiado fino: La consistencia en forma de polvo tira del papel y restringe el flujo de aire. Causa golpes duros.
- No demasiado grueso: Los trozos grandes crean grumos y quema desigual. Crea "corredores" o "canoas".
- Justo a la derecha: Esponjoso, incluso piezas similares a la textura de orégano seco. Debe mantener la forma cuando se presiona.
style="Margen: 1rem 0; Altura de línea: 1.75;">Eliminar tallos: Crean agujeros en la articulación y tienen un sabor duro. Incluso los pequeños tallos afectan la calidad de la quemadura.
style="Margen: 1rem 0; Altura de línea: 1.75;">Cantidad: 0.5-0.75 gramos para una articulación estándar. Mejor empezar más pequeño, siempre puedes tirar otro.
style="Margin: 1rem 0; Altura de línea: 1.75;">Recomendación de Grinder: Una molinillo de 4 piezas de calidad con [kief catcher]( https://munchmakers.com/blog/the-ultimate-guide-to-weed-grinders-with-kiefcatchers.com/the-countage-guide-to-weed-grinders-with-with-kiefcatchers.com/the-counter-co----------------------------------------------------------------------------- Consulte nuestra guía sobre mejores molinillos para cannabis o navegue molinillos de calidad superior en Munchmakers.
Paso 3: Crea el pliegue
style
Sostenga papel con tira de goma en la parte superior, frente a usted. Coloque su filtro preparado en un extremo (generalmente extremo izquierdo para personas diestras).
syn.
Crear un canal: Doble suavemente el papel a lo largo para crear una ligera forma en V o un canal. Este pliegue retendrá su cannabis y facilitará el rodaje.
Paso 4: Llena con cannabis molido
style="Margen: 1rem 0; Altura de línea: 1.75;">Distribute el cannabis molido de manera uniforme a lo largo del pliegue:
- más en el medio, afilando ligeramente hacia los extremos
- Dejar espacio en la tira de encía y en el filtro cercano
- No sobrellenar - Menos es más fácil de rodar que más
style="Margen: 1rem 0; Altura de línea: 1.75;">Error común: Cargando demasiado cannabis. Siempre puedes rodar una segunda articulación. Las juntas sobrellenadas son casi imposibles de rodar para los principiantes.
Paso 5: Forma la articulación
style
Aquí es donde se desarrolla la habilidad de rodar:
style
El movimiento:
- Pellizque el papel entre los pulgares y los dedos índice en ambos lados del cannabis
- Enrolle de un lado a otro suavemente (no de lado a lado, movimiento de ida y vuelta)
- El cannabis debe empacar y formarse en un cilindro
- El filtro ayuda a mantener la forma en ese extremo
style="Margen: 1rem 0; Altura de línea: 1.75;">Objetivo: Cilindro de cannabis de forma uniforme pero no comprimida.
style="Margen: 1rem 0; Altura de línea: 1.75;">Tiempo necesario: 15-30 segundos de configuración. No se apresure.
Paso 6: El Tuck (paso crítico)
style
Aquí es donde la mayoría de los principiantes luchan. El pliegue determina el éxito o el fracaso.
style
Cómo poner:
1. Trabajar desde el extremo del filtro (más fácil)
2 . Mete el borde inferior del papel (lado no encía) debajo del cannabis y sobre el filtro
3. Use sus pulgares para meter mientras los índices aplican una suave presión hacia abajo
4. Una vez que comenzó, el Tuck debe continuar a lo largo de la longitud mientras rueda
style="Margen: 1rem 0; line-height: 1.75;">La sensación: Deberías sentir el papel atrapado bajo el cannabis. Si no se está metiendo, remodela el cannabis más apretado.
style="Margen: 1rem 0; Altura de línea: 1.75;">Punto común: Doblado de papel sin atrapar bajo cannabis. Solución: Empaque el cannabis más ajustado en forma de cilindro primero.
Paso 7: Rodar a la tira de encía
style
Una vez que se inicia el tuck:
1. Continúe rodando hacia arriba usando una presión uniforme
2 . El papel debe envolver el cilindro de cannabis
3. Ruede hasta que solo se muestre la tira de encía
4. Mantenga la tensión constante a lo largo de toda la longitud
style="Margen: 1rem 0; Altura de línea: 1.75;">Comprobar: Antes de sellar, mire hacia abajo la longitud. Debe ser uniforme, no grumoso o suelto.
Paso 8: Sellar la junta
style
lamer la encía:
- Lame toda la tira de encías generosamente (no seas tímido)
- Algunos papeles necesitan más humedad que otros
- comenzar de un extremo y trabajar al otro
- Presiona firmemente mientras sellas
- Sostenga la junta sellada durante 5-10 segundos
style="Margen: 1rem 0; Altura de línea: 1.75;">Alternativa moderna: Algunos usan un paño húmedo en lugar de lamer para la higiene.
Paso 9: Empaque y termine
style
Embalaje del extremo abierto:
- Use un bolígrafo, un palo pequeño o su dedo meñique
- Empaque suavemente el cannabis hacia abajo desde el extremo abierto
- Esto aprieta toda la articulación y asegura que la quema incluso
- No empacar tan fuerte que restringe el flujo de aire
sy
Cerrar la punta:
- Gire el exceso de papel cerrado (método clásico)
- O déjelo abierto y quema con cuidado el exceso cuando se enciende
- Punta torcida evita que el cannabis se caiga
Paso 10: Control de calidad
style="Margen: 1rem 0; Altura de línea: 1.75;">Una buena articulación:
- Firme pero no duro como una roca
- Espesor uniforme a lo largo de la longitud
- Puede sacar aire fácilmente
- Totalmente sellado sin huecos
- Filtro seguro y no gira
style="margin: 1rem 0; line-height: 1.75;">si falla, compruebe: ¡Fúmelo de todos modos! "Un feo pero funcional" te enseña más que tirarlo.
Problemas y soluciones de laminación comunes
Problema: la articulación es grumosa/desigual
style="Margen: 1rem 0; Altura de línea: 1.75;">Causa: Distribución desigual del cannabis o modelado insuficiente antes de rodar.
style="Margen: 1rem 0; Altura de línea: 1.75;">Fix: Dedica más tiempo a la configuración del paso 5. Redistribución de cannabis si es necesario antes de meterlo.
Problema: Articulación demasiado floja, se desmorona
style="Margen: 1rem 0; Altura de línea: 1.75;">Causa: No hay suficiente tensión al rodar o sobrellenar.
style="Margen: 1rem 0; Altura de línea: 1.75;">Fix: Usa menos cannabis la próxima vez. Aplicar una presión más constante durante el laminado.
Problema: Articulación demasiado apretada, no dibujará
style="Margen: 1rem 0; Altura de línea: 1.75;">Causa: Cannabis comprimido o envasado con demasiada firmeza.
style
Fix: Empaque con más suavemente. Prueba de robo antes de sellar: debe tener un flujo de aire fácil.
Problema: desgarros de papel durante el rodadura
style="Margen: 1rem 0; Altura de línea: 1.75;">Causa: Demasiada presión, manos secas o papeles de baja calidad.
style="Margen: 1rem 0; Altura de línea: 1.75;">Fix: Use un toque más suave. Puntas ligeramente humedecidas. comprar mejores papeles.
Problema: el filtro se cae
style="Margen: 1rem 0; Altura de línea: 1.75;">Causa: Filtro demasiado pequeño o no está correctamente integrado en el rollo.
style="Margen: 1rem 0; Altura de línea: 1.75;">Fix: Hacer que el filtro sea un diámetro ligeramente mayor. Asegúrese de que se enrolle en la junta, no solo se coloca al final.
Problema: forma de cono en lugar de cilindro
style="Margen: 1rem 0; Altura de línea: 1.75;">Causa: más cannabis en un extremo que en el otro.
style
fix: ¡Esto está realmente bien! Las uniones de cono son populares (extremo de grasa, extremo de filtro estrecho). Muchos prefieren esta forma.
Problema: Corrientes conjuntas o canoas
style="Margen: 1rem 0; Altura de línea: 1.75;">Causa: Empaques desiguales o viento mientras fuma.
style="Margen: 1rem 0; Altura de línea: 1.75;">Fix: Enfoque en la distribución uniforme en el paso 4. Gire la junta mientras se ilumina para garantizar una cereza uniforme.
Consejos de rodamiento de expertos
style="Margen: 1rem 0; Altura de línea: 1.75;">Consejo 1: Comience con más papel del que cree
Los principiantes suelen utilizar papeles que son demasiado pequeños. 1 ¼ de tamaño te da espacio para trabajar.
style="Margen: 1rem 0; Altura de línea: 1.75;">Consejo 2: Practique primero con tabaco o hierbas
Algunas personas practican la técnica de laminación con tabaco barato o hierbas secas antes de "desperdiciar" el cannabis. Desarrolla la memoria muscular.
style="Margen: 1rem 0; Altura de línea: 1.75;">Consejo 3: Utilice un método de rodadura de billete de dólar
Coloque el filtro y el cannabis en un billete de un dólar, forme, luego deslice el papel en la factura y use el billete como guía de balanceo. Ruedas de entrenamiento para el aprendizaje.
style
Consejo 4: Existen conos prefabricados
No es una vergüenza usar conos pre-rollados que acaba de llenar. Muchos rodillos experimentados los usan para la consistencia.
style
Consejo 5: Los primeros 10 serán feos
Aceptar que los primeros intentos serán funcionales en el mejor de los casos. Lanzamiento de la articulación es una habilidad que requiere práctica. El número 15-20 es cuando la mayoría de las personas alcanzan la coherencia.
Consideraciones avanzadas
Impacto del tipo de papel
style="Margen: 1rem 0; Altura de línea: 1.75;">Papeles de cáñamo: lento, incluso quemado. Sabor natural. Lo suficientemente grueso como para ser indulgente.
style="Margen: 1rem 0; Altura de línea: 1.75;">Papels de arroz: Muy delgado. sabor más limpio. Menos indulgente para principiantes.
style="Margen: 1rem 0; Altura de línea: 1.75;">Pulpa de madera: Papeles clásicos. quemadura más rápida. Sabor fuerte.
Rodando sin filtro
style="Margen: 1rem 0; Altura de línea: 1.75;">Algunos prefieren juntas sin filtro. Pellizque el extremo cerrado o dóblelo. Proporciona un flujo de aire ligeramente mejor, pero requiere fumar con cuidado para evitar el cannabis suelto en la boca.
El método del cono
style="Margen: 1rem 0; Altura de línea: 1.75;">En lugar de cilindro, forme un cono (más ancho en la punta, angosto en el filtro). Muchos encuentran esto más fácil. Llena el extremo ancho con más cannabis, creando conicidad natural.
La práctica hace al pleito
style
Cronología realista:
- Uniones 1-3: Probablemente fea, tal vez fumable
- Uniones 4-7: Funcional, mejorando
- Uniones 8-15: Constantemente fumables
- Juntos 15+: Desarrollando tu estilo personal
style="Margen: 1rem 0; Altura de línea: 1.75;">¡No te rindas! Incluso los rodillos experimentados recuerdan haber luchado inicialmente. Es una habilidad física como atar zapatos, parece imposible hasta que de repente hace clic.
Alternativas al laminado manual
style
Conos pre-rollados:
- comprar el papel ya en forma
- Solo llena con cannabis molido
- Empacar y torcer
- Resultados consistentes cada vez
- Más información: Vea nuestro comparación de conos pre-rollados vs mano-rolling
style
Máquinas de laminación:
- Dispositivo de $5-10 que rueda para ti
- Cargue papel y cannabis, gire el mango
- Cilindros perfectos pero menos satisfactorio que el laminado a mano
- Mejores opciones: Echa un vistazo a guía de rodillos de unión
style="Margen: 1rem 0; Altura de línea: 1.75;">Pídele a alguien que tire:
- No es una vergüenza tener un amigo experimentado que te atraviese mientras aprendes
- Vigila de cerca su técnica
Consejos de expertos para obtener mejores resultados
style="Margen: 1rem 0; Altura de línea: 1.75;">Desde Professional Rollers (edición 2026):
style="Margen: 1rem 0; Altura de línea: 1.75;">1. Temperature Matters: Las manos ligeramente calientes y secas funcionan mejor. Las manos frías o húmedas hacen que el papel se adhiera torpemente.
style="Margen: 1rem 0; Altura de línea: 1.75;">2. La técnica de iluminación afecta la calidad del rollo: Incluso la junta enrollada mejor necesita una iluminación adecuada. Encienda la punta mientras gira para asegurar que sea uniforme.
style="Margen: 1rem 0; Altura de línea: 1.75;">3. Conservación de almacenamiento: Las juntas enrolladas adecuadamente se pueden almacenar durante meses. Obtenga información sobre técnicas de almacenamiento de cannabis para mantener frescas las juntas prelaminadas.
style="Margen: 1rem 0; Altura de línea: 1.75;">4. Actualice su configuración: Invierta en una calidad bandeja de laminado para organizar sus materiales y evitar el desperdicio.
Técnicas de rodadura relacionadas
style
Una vez que haya dominado la articulación básica, explore estas técnicas avanzadas:
syn style="Margin: 1rem 0; Padding-Left: 2rem; list-style-type: disc;"> sty
style: 1.300 1.000 1.000 1.000 1.000 1.000 1.000 1.000 1.000 1.000 1.000 1.000 1.000 1.000 1.000 1.000 1.000 1.000 1.000 1.000 1.000 1.000 1.000 1.000 1.000 1.000 1.000 1.000 1.000 1.000 1.000 1.000 1.000 1.000 1.000 1.000 1.000 1.000 1.00 100 100 100 100 100 100 100 100 100 100 100 100 100 100 100 100 100 100 100 100 100 100 100 100 100 100 100 100 1
style="Margen: 1rem 0; Altura de línea: 1.75;">Esta guía es para fines educativos en regiones donde el cannabis es legal. Las leyes de cannabis varían según la jurisdic Siempre consulte las regulaciones locales.
Step 1:
Step 2:
Step 3:
Step 4:
Step 5:
Step 6:
Step 7:
Step 8:
Frequently Asked Questions
Los papeles de 1¼ de tamaño (78 mm) son ideales para principiantes. Son lo suficientemente grandes para trabajar, pero no tanto como para desperdiciar cannabis. El tamaño king puede ser intimidante para los primeros intentos.
Related Guides
Rolling Paper Sizes Explained: 1 1/4, King Size, and More
Comprehensive guide about rolling paper sizes explained: 1 1/4, king size, and more. Learn everything you need to know with expert tips and detailed instructions.

Best Rolling Papers for Beginners: Complete Buying Guide 2026
Discover the best rolling papers for beginners including RAW, Zig-Zag, and OCB. Learn about sizes, materials (rice vs hemp vs wood pulp), and which papers are easiest to roll with.
Clear Rolling Papers: Are Cellulose Papers Worth It?
Comprehensive guide about clear rolling papers: are cellulose papers worth it?. Learn everything you need to know with expert tips and detailed instructions.